Here's a quick guide to create a macOS Mojave 10.14 Public Beta Installation USB using Clover. Please note, this guide is not universal, and may not work for all systems.
STEP 1: Download macOS Mojave Public Beta
1. Enroll in the Free Apple Beta Software Program
2. Download Public Beta Access Utility
3. Run installer. The Mac App Store will open.
4. Download macOS Mojave Public Beta
The Application Install macOS Mojave Beta will appear in /Applications.
STEP 2: Prepare Bootable USB Drive
This step extracts the Installer contents, then installs Clover bootloader to the USB stick.
1. Insert the USB drive
2. Open /Applications/Utilities/Disk Utility
3. Highlight the USB drive in left column
4. Click on the Partition tab
5. Click Current and choose 1 Partition
6. Click Options...
7. Choose GUID Partition Table
8. Under Name: type USB (You can rename it later)
9. Under Format: choose Mac OS Extended (Journaled)
10. Click Apply then Partition
11. Open /Applications/Utilities/Terminal
12. Type the following, enter password and hit enter. This command completely erases the USB, then creates native installer media from the Install Mojave Beta Application.
Release:
Beta:
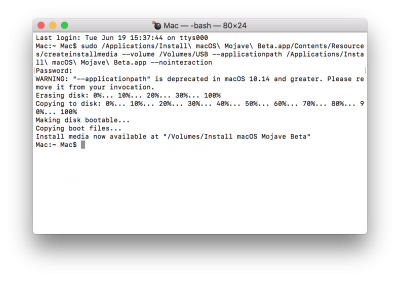
Upon completion, the USB will be renamed Install macOS Mojave Beta.
Upon completion, the USB will be renamed Install macOS Mojave Beta.
13. Download the most recent standalone Clover installer from the download section.
14. Install UEFI or Legacy Clover version using the USB (Install macOS Mojave Beta) as the target.
15. Navigate to /EFI/CLOVER/kexts/Other/ and add FakeSMC.kext
16. (Optional) Navigate to /EFI/CLOVER/kexts/Other/ and add your ethernet kext
17. (Optional) Navigate to /EFI/CLOVER/kexts/Other/ and add NullCPUPowerManagement.kext
Your Clover Installation USB is now finished.
For post installation instructions and screenshots, please see
https://www.tonymacx86.com/threads/unibeast-install-macos-high-sierra-on-any-supported-intel-based-pc.235474/
Clover Developers:
Slice, with help of Kabyl, usr-sse2, jadran, Blackosx, dmazar, STLVNUB, pcj, apianti, JrCs, pene, FrodoKenny, skoczy, ycr.ru, Oscar09, xsmile, SoThOr, rehabman, Download-Fritz, Zenit432, cecekpawon
https://www.tonymacx86.com/threads/how-to-create-a-macos-mojave-public-beta-installation-usb.254626/
STEP 1: Download macOS Mojave Public Beta
1. Enroll in the Free Apple Beta Software Program
2. Download Public Beta Access Utility
3. Run installer. The Mac App Store will open.
4. Download macOS Mojave Public Beta
The Application Install macOS Mojave Beta will appear in /Applications.
STEP 2: Prepare Bootable USB Drive
This step extracts the Installer contents, then installs Clover bootloader to the USB stick.
1. Insert the USB drive
2. Open /Applications/Utilities/Disk Utility
3. Highlight the USB drive in left column
4. Click on the Partition tab
5. Click Current and choose 1 Partition
6. Click Options...
7. Choose GUID Partition Table
8. Under Name: type USB (You can rename it later)
9. Under Format: choose Mac OS Extended (Journaled)
10. Click Apply then Partition
11. Open /Applications/Utilities/Terminal
12. Type the following, enter password and hit enter. This command completely erases the USB, then creates native installer media from the Install Mojave Beta Application.
Release:
Beta:
13. Download the most recent standalone Clover installer from the download section.
14. Install UEFI or Legacy Clover version using the USB (Install macOS Mojave Beta) as the target.
15. Navigate to /EFI/CLOVER/kexts/Other/ and add FakeSMC.kext
16. (Optional) Navigate to /EFI/CLOVER/kexts/Other/ and add your ethernet kext
17. (Optional) Navigate to /EFI/CLOVER/kexts/Other/ and add NullCPUPowerManagement.kext
Your Clover Installation USB is now finished.
For post installation instructions and screenshots, please see
https://www.tonymacx86.com/threads/unibeast-install-macos-high-sierra-on-any-supported-intel-based-pc.235474/
Clover Developers:
Slice, with help of Kabyl, usr-sse2, jadran, Blackosx, dmazar, STLVNUB, pcj, apianti, JrCs, pene, FrodoKenny, skoczy, ycr.ru, Oscar09, xsmile, SoThOr, rehabman, Download-Fritz, Zenit432, cecekpawon
https://www.tonymacx86.com/threads/how-to-create-a-macos-mojave-public-beta-installation-usb.254626/
Hiç yorum yok:
Yorum Gönder