2 Haziran 2016 Perşembe

Microsoft Office - Download and Install Office 2016 for Windows via OnTheHub

Microsoft Office - Download and Install Office 2016 for Windows via OnTheHub

Step 1. Go to the Full Sail OnTheHub site. Then, log in using your Full Sail username and password.
Step 2. Select the MS Office 2011 tab at the top of the screen.
Step 3. Select Office Professional Plus 2016.

Step 4. Click Add to Cart on the right side. Notice that this is a Free Purchase.

Step 5. On The Hub will display Your Cart.  Verify that the Order Information is correct.
Step 6. Click Check Out to complete the purchase.

Step 7. Review the license agreement and then fill in the username and signature at the bottom of the screen.
Step 8. Click I accept

Step 9. Answer the customer survey and click Next.

Step 10. Enter your Order Information, located at the bottom of the screen.
Step 11. Click Proceed With Order.

Step 12. Your receipt will display. An e-mail containing this receipt should have now been sent to your inbox provided; however the Product Key WILL NOT be in the e-mail.  Your Product Key listed below on the receipt will ONLY appear in your On The Hub Account for 30-DAYS.
Step 13. After retrieving your key from OnTheHub, select the Start Download button.


Step 14. Click Download beneath the Office Professional Plus 2016 header.

Step 15. When the download is complete, double-click the file in the download bar at the bottom of the window
Step 16. A window will pop up asking if you want to allow Microsoft to make changes to your computer. Click Yes.
Step 17. The Office downloader will now display two windows: A loading graphic, and a progress window displaying which programs are in the process of downloading, and which programs have been completed. 

Step 18. Microsoft Office is now installed on your computer.

https://fso.zendesk.com/hc/en-us/articles/207031703-Microsoft-Office-Download-and-Install-Office-2016-for-Windows-via-OnTheHub

Windows 8.1 with Yosemite - Installation with Boot Camp Assistant (Macs with Optical Drives)


Windows 8.1 with Yosemite - Installation with Boot Camp Assistant (Macs with Optical Drives)

This tutorial will show you how to install the Windows 8.1 Operating System on your Mac in the Yosemite OSX 10.10. This tutorial should be used if your Mac has an Optical Drive. You will need a blank DVD and a Flash Drive (at least 4Gb) to complete this process.


PART 1
Step 1. Go to your account on Full Sail's OnTheHub Site: Click Here 


Step 2. Log in and click on “Dreamspark Premium” across the gray toolbar. Then click on Windows 8.1.


Step 3. Add Windows 8.1 to your cart.


Step 4. Go to your shopping cart and begin the checkout process. Follow the prompts until you reach the screen with your order receipt. Please keep in mind that this software download will not cost you anything. You may see an option to purchase additional services, but these are optional and can be disregarded. 

Step 5. Once the checkout is complete, you will see your order details which include your Product Key and download link. You will need to copy your Product Key before beginning the download, as outlined below. 

5A. Your Product Key will display in RED lettering (our code is blocked out in this example). You will need to write this code down, as you will need to enter it once you are on the Windows side, at which point you will not be able to access this page. 

IMPORTANT: After 30 days, you will no longer be able to access this screen. Make sure you copy your product key and save it in a safe place, as you will need your Product Key if you have to reinstall Windows in the future. 

5B. After copying your product key click "Start Download."


Step 6. A new window will appear asking you to download two files. The first file is the Secure Download Manager, and the second download is your order package (.sdx file). Download the Secure Download Manager first.


Step 7. Once the Secure Download Manager is finished downloading you will need to install it before continuing to download the .sdx. The steps are outlined below.

7A. Locate and double click the SDM.pkg file:


7B. Click "Continue." 


7C. Review the software license agreement and click "Continue."  


D. Click "agree" to agree to the license agreement. 


7E. You will most likely be asked for your computers password to complete the installation. When installation is complete, click "Close." 


Step 8. Download the Order Package (.SDX file) and open the file. The Secure Download Manager will now open and you will see the screen below. Click "Start Download" next to the Windows 8.1 64-Bit Download. Make sure to download the 64-bit version. The screenshot below shows the download in progress.


PART 2
Step 9. Once the download is complete, locate the .ISO file in Finder. By default, it will likely be downloaded in your Downloads folder. 


Step 10. Once you locate it, double click on it.


Step 11. Navigate to your Disk Utility application. It is located in Finder > Applications > Utilities. You can also use the spotlight search (command+spacebar) to locate the application. Once Disk Utility is open, insert your Blank DVD into your optical drive. 


Step 12. Once Disk Utility is open, select the Windows .ISO file that appears on the left. Then click on the burn button at the top of the Window.


Step 13. It is highly recommended that you change the Burn Speed to 2x. This will reduce the risk of an error occurring during the burn process. Once this is done, click the "Burn" button.


Step 14. If the process was successful, you should see the following prompt. Once this is done, please proceed to part 3.


PART 3
Step 15. Once the download is complete you are ready to begin with Boot Camp Assistant. Start by opening the Boot Camp Assistant application. It is located in Finder > Applications > Utilities. You can also use the spotlight search (command+spacebar) to locate the application. 


Step 16. Once the Boot Camp Assistant is open you'll see this screen, click Continue and move to the next screen.


Step 17. This step is where you will need your USB Flash Drive and your newly created Windows installation disk. Plug it into your computer at this time. Please keep in mind for this process the Flash/Hard Drive needs to be formatted and all data will be erased. So if there is anything on the drive you wish to keep please back it up on another computer/hard drive before continuing. 

17A. All boxes should already be checked off by default in this window. Click "Continue."


17B. You will proceed to this page. This page is asking where you would like the Drivers for Windows (Windows Support Software) to be downloaded to. Your flash drive should appear in this window, please select this and click the continue button. 


Step 18. After the process is complete, you will need to select how to divide your hard drive. Select "Divide Equally" and then click "Install." This will begin the partitioning, and your computer will restart and boot from your USB Drive. This will begin the installation of windows and you will no longer be able to access this tutorial from the computer you are installing from. If you wish to continue using this tutorial please either print it or open it on another computer.


Part 4
The next steps begin after the computer restarts. We apologize for the low quality of the photos but we are unable to take screen shots during this part of the process. 

Step 19. Choose your Language, Time and Currency Format, and Keyboard or input method. Then click "Next."


Step 20. Enter the Product Key that you received on the OnTheHub website (Step 5). Click “Next” to continue.


Step 21. Read the licensing agreement and check the box to accept the license terms. Click "Next" to continue. 


Step 22. You will need to choose which partition to use to install Windows 8.1. Please follow the prompts as outlined below. 

22A. Choose the partition located on the bottom of the list (ours says Drive 0 Partition 4). You will see an error at the bottom of the screen saying it cannot be installed on this partition-- this is okay, after you format the drive, the error will go away. Click on the correct drive once and then click "Format." 


22B. You will receive a message stating that all data on the drive will be lost. Click "Okay" to format the drive and click "Next" on the main window.


22C. After clicking "Next" the Windows 8.1 installation will begin. This can take some time so please be patient while the computer installs the operating system. After this process completes, the computer will reboot (possibly more than once).


PART 5
Step 23. You will be prompted to setup your Windows preferences. The selection prompts are shown below. 

23A. Choose a color and a PC name, and click "Next."


23B. Click "Use Express Settings" and "Continue." 


23C. Fill in your account information and click "Finish." 


23D. After you make your selections, your default applications will begin to install. This can take some time, so please be patient.


PART 6
Step 24. Next you will see a “Welcome to the Boot Camp installer” prompt. This will install the Apple Support Drivers to allow the use of your hardware on the Windows 8.1 Operating System. Follow the prompts as outlined below. 

24A. Click "Next."


24B. Check the box to accept the terms in the license agreement, and click "Install."


24C. Click "Finish."


24D. Click "Yes" to restart. 


After restarting, your installation should be complete, and your computer will boot into your Windows Desktop. If you wish to switch back to your Mac partition, simply restart your computer and hold the Option key on your keyboard. Once it loads, you will be given an option to choose your Macintosh HD or Windows HD. Click on “Macintosh HD” and it will load your Mac operating system. 

By default, your computer will restart into the Windows partition. If you wish to change the default, open System Preferences on the Mac OS, and go to “Startup Disk.” 


https://fso.zendesk.com/hc/en-us/articles/203708000-Windows-8-1-with-Yosemite-Installation-with-Boot-Camp-Assistant-Macs-with-Optical-Drives-

9 Mayıs 2016 Pazartesi

Photoshop Ekran Kararma Problemi

Windows 8 'de Photoshop Ekran

 Kararma Problemi            


2014 ün ilk tasarımını yapmak için kolları sıvadım ve photoshop'u açtım. Bir süre sonra bir kaç problemle karşılaştım. Ekran kararması ya da farklı bir deyişle göz kırpması gibi bir sorun. Mouse ile zoom yaptığımda kendini daha çok belli ediyor bu sorun. Tasarıma yazı ekleyip yazı özelliklerine girdiğimde ne göreyim. Simsiyah ekran. Yazı özelliklerinden çıktığımda düzeliyordu. Başta anlam veremedim. Sonra araştırmalarım sonucunda ekran kartı ile ilgili bir sorun olduğunu gördüm. NVIDIA GeForce GT520M ekran kartım şu an için yeterince iyi olmasına rağmen sürücü problemlerinden dolayı olduğunu araştırmalarım sonucu öğrendim. Bazı ekran kartlarında bu sorun olduğu yönünde şikayetlere göz gezdirdim.
Sorun ile ilgili çektiğim ekran alıntılarını aşağıdan inceleyebilirsiniz. Ekranı büyütmek için fotoğraf üzerine tıklayabilirsiniz.
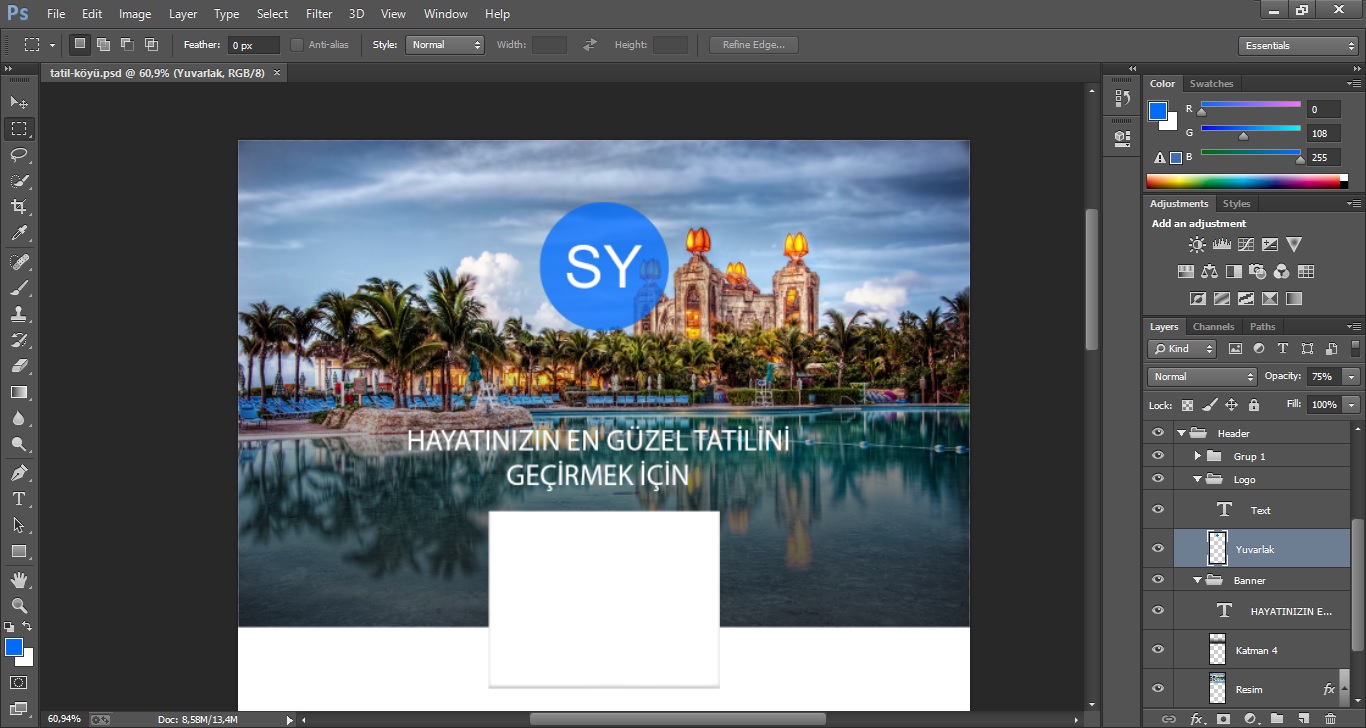
Alttaki resim ekranın normal görüntüsü
photoshop cs6
Alttaki resim zoom yaptığımdaki görüntüsü, etraf kararıyor farkettiyseniz
photoshop cs6 kararma hatası
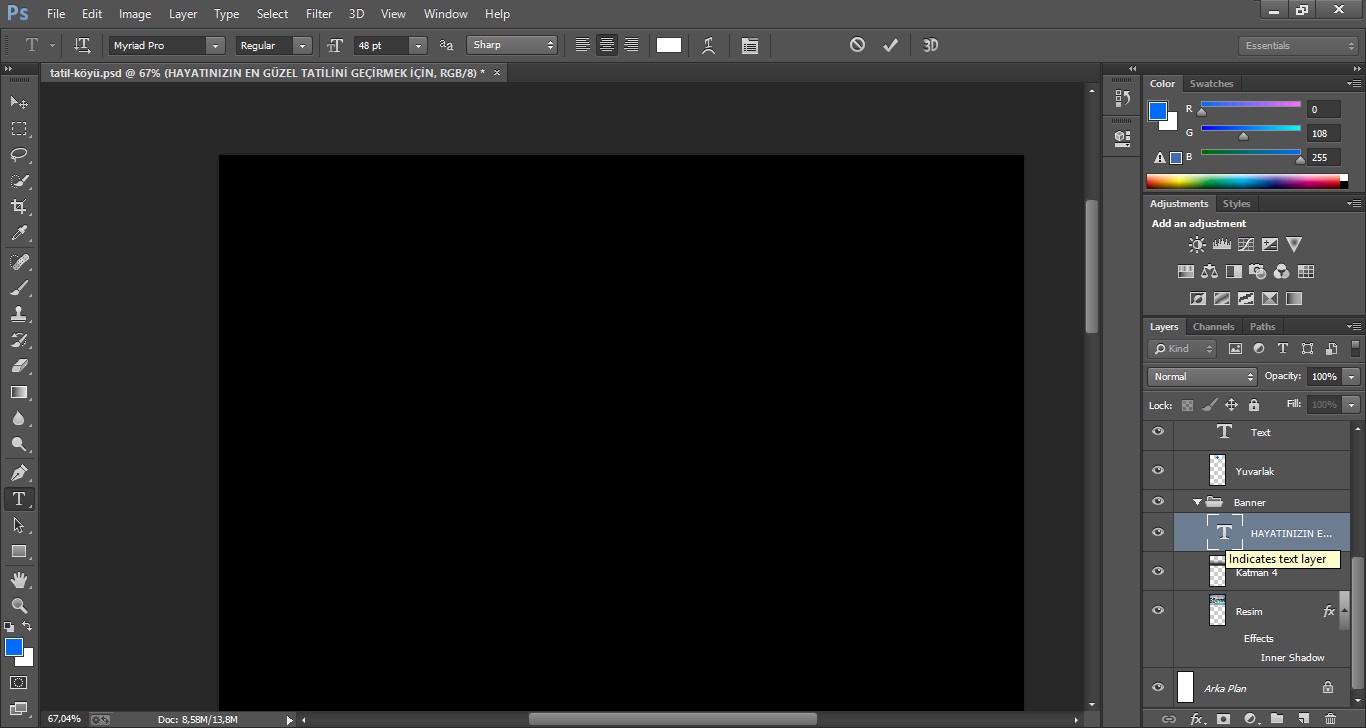
Alttaki son resim de bir yazıya çift tıkladığımdaki görüntüsü, çalışma alanı simsiyah hiç birşey görünmüyor.
photoshop cs6 kararma hatasıEğer ekran kartını güncellediğiniz halde böyle bir sorunla karşı karşıyaysanız anlatacağım yöntemle bundan kurtulabilirsiniz.

Sorunun Sebebi

Use Graphic Processor'un türkçesi Ekran İşlemcisini Kullan 'dır. Fakat sürücü problemlerinden ötürü ekran işlemcisini tam verimli kullanamıyor ve bir takım hatalar meydana geliyor. Çok aşırı detaylarla uğraşan tasarımcılar için bu seçenek elbette önemli ancak keyfi işlemlerle uğraşıyorsanız herhangi bir performans kaybı yaşayacağınızı düşünmüyorum.

ÇÖZÜM

Photoshop programı açık iken yukarıdaki bölmeden
Edit > Preferences > General veya Ctrl + K tuş kombinasyonuna basınız. Soldaki menüdenPerformance bölümüne giriniz. "Use Graphic Processor" seçeneğinin işaretini kaldırınız ve OKtuşuna basarak ayarları kaydediniz. Şimdi Photoshop programını kapatıp yeniden açıp deneyiniz ve sorunun ortadan kalktığını göreceksiniz.

http://www.sertacyarbas.com/Makale/Windows-8-de-Photoshop-Kararma-Problemi

Microsoft Office 2007/2010/2013 (Win) - Repairing Corrupted Program Files

Microsoft Office 2007/2010/2013 (Win) - Repairing Corrupted Program Files

This document explains how to correct Microsoft Office if it is not working or crashes frequently. These solutions apply to Office 2013, 2010 and 2007. For Office 2003 and earlier versions, see Microsoft Office 2000/XP/2003 (Win) - Repairing Corrupted Program Files. Sometimes, you have to completely remove and reinstall Microsoft Office to fix corruption issues: Windows - Office 2007 / 2010 / 2013 - Uninstalling

SYMPTOM

One of the Microsoft Office programs (Word, Excel, PowerPoint, Access, Outlook, etc) is behaving oddly, or not working at all.

CAUSE

A necessary Office file may have been deleted, or a file used by the Office application was corrupted during a program crash or your computer's hardware may be at fault.

SOLUTION

Office 2010/2013

  1. To begin, click on Start and then Control Panel.
    Start Menu
  2. After the Control Panel window opens, click on Uninstall a Program.
    Control Panel
  3. A list of all installed programs should now appear. Highlight Microsoft Office 2010, and click on Change.
    Uninstall Program
    • Note: The exact title of Microsoft Office 2010 may depend on the version installed on your computer.
  4. After the dialog box loads, choose the Repair option and click Continue.
    Repair Office 2010
  5. This process may take a few minutes, but after completion, you will be prompted to exit and restart any open Office programs. You may then clickClose. You may be prompted to reboot your computer to apply all changes and complete setup.
    Repair Complete

Office 2007

  1. To begin, go to the Start Menu > All Programs > Microsoft Office > Microsoft Office Tools, and then click on Microsoft Office Diagnostics.
    Office_07_Start_Menu.png
  2. After Microsoft Office Diagnostics opens, click Continue on the first page.
    Office 2007 Diagnostics
  3. By default, all of the diagnostic tests are enabled, so you may click on Run Diagnostics to proceed with diagnosis and repair.
    Run Office 2007 Diagnostics
    • For a summary of each diagnostic, visit Microsoft's site.
    • Note: You may be asked to insert the Office 2007 installation disk during the Setup Diagnostic.
  4. After running the diagnostics, a results page will be displayed. After clicking continue, your web browser will load with Microsoft's recommendations for the next steps to resolve any discovered issues with Microsoft Office.
    Office 2007 Diagnostics Results
  5. Document is unavailable at this time.Document is unavailable at this time.
    https://kb.wisc.edu/helpdesk/page.php?id=9344#Office 2010

18 Nisan 2016 Pazartesi

Install OS X El Capitan on Any Supported Intel-based PC

The following guide is a complete walkthrough for updating to or installing a fresh version of OS X El Capitan. It requires no experience and all of the basic installation and post-installation tools are available on tonymacx86.com. 

Table of Contents


Before You Begin

1. Register here at tonymacx86! If you don't have a user account, create one!
2. Get our latest UniBeast and MultiBeast tools from the downloads section. 
3. Purchase a 16GB or larger USB drive. 
4. Do a full backup of your system. We strongly recommend performing a full backup of your existing system using Carbon Copy Cloner. By doing this, you can always go back to your working installation. 

UniBeast is a tool that creates a bootable installer out of your downloaded version of OS X. In order to start fresh, you'll need access to a functional computer running Mac OS X Snow Leopard 10.6.8 or later. This is a requirement, as you need access to the Mac App Store to download OS X and create the installation drive. To start from scratch, booting the 10.6 Snow Leopard Retail DVD directly, check out iBoot + MultiBeast

For the first time tonymacx86.com is recommending Clover as your default bootloader. If you have followed updates until OS X Yosemite using Chimera, check out Clover Basics and Switching Advice.

Existing Clover users may do a direct update to OS X El Capitan by simply running the Install OS X El Capitan app as normal Mac users would. Follow these steps: Direct Update to OS X El Capitan using Clover.


STEP 1: Download OS X El Capitan
The full operating system is a free download for anyone who has purchased Mac OS X Snow Leopard, Lion, or Mountain Lion or has a Mac preloaded with OS X Mavericks or Yosemite. Download the Application from the Mac App Store using your Apple ID on any Mac or functional computer running Mac OS X 10.6.8 or later.

1. Open Mac App Store
2. Log in with your Apple ID
3. Download OS X El Capitan

The Application Install OS X El Capitan will appear in /Applications.
UniBeast: Install OS X El Capitan on Any Supported Intel-based PC-buyelcap.png

STEP 2: Create a Bootable USB Drive with UniBeast
Take a deep breath and take your time- this is pretty simple, but it's easy to miss things if you rush. Follow each step to the letter.

1. Insert the USB drive
2. Open /Applications/Utilities/Disk Utility
3. Highlight the USB drive in left column
UniBeast: Install OS X El Capitan on Any Supported Intel-based PC-createusb.png
UniBeast: Install OS X El Capitan on Any Supported Intel-based PC-diskutil-1.png
4. Click on the Partition tab
5. Click Current and choose 1 Partition
UniBeast: Install OS X El Capitan on Any Supported Intel-based PC-diskutil-2.png
6. Click Options...
7. Choose GUID Partition Table 
UniBeast: Install OS X El Capitan on Any Supported Intel-based PC-diskutil-3.png
8. Under Name: type USB (You can rename it later)
9. Under Format: choose Mac OS Extended (Journaled)
10. Click Apply then Partition
UniBeast: Install OS X El Capitan on Any Supported Intel-based PC-diskutil-4.png
11. Download and run UniBeast 
12. Click ContinueContinueContinueContinueAgree
13. At Destination Select, choose USB and click Continue
UniBeast: Install OS X El Capitan on Any Supported Intel-based PC-ub1.png
14. At Select OS Installation screen choose El Capitan and click Continue
UniBeast: Install OS X El Capitan on Any Supported Intel-based PC-ub2.png
15. At Bootloader Options screen choose UEFI Boot Mode or Legacy Boot Mode
UniBeast: Install OS X El Capitan on Any Supported Intel-based PC-ub3.png
16. (Optional) At Graphics Configuration screen choose the appropriate graphics option for your system and click Continue.
17. Verify installation options, then click Continue, enter password and click Install
UniBeast: Install OS X El Capitan on Any Supported Intel-based PC-ub5.png
UniBeast will now create the bootable USB drive. The process will only take about 10 minutes, depending on system and drive speed. Do not unplug or stop during this time. 
UniBeast: Install OS X El Capitan on Any Supported Intel-based PC-ub6.png

18. Drag MultiBeast to your completed USB drive.

Clover Note: UniBeast delivers basic bootloader support based on our testing on recommended CustoMac systems. For further bootloader customization, download and run the official Clover package. Advanced users may also compile Clover by downloading the full source. 


STEP 3: Recommended BIOS Settings
If you're installing on a recommended CustoMac desktop with AMI UEFI BIOS, the options are simple. For other systems make sure to set your BIOS to Optimized Defaults, and your hard drive to AHCI mode. Here are standard AMI UEFI BIOS settings for Gigabyte AMI UEFI BIOSGigabyte AWARD BIOSASUS AMI UEFI BIOS, and MSI AMI UEFI BIOS.

1. To access BIOS/UEFI Setup, press and hold Delete on a USB Keyboard while the system is booting up
2. Load Optimized Defaults
3. If your CPU supports VT-d, disable it
4. If your system has CFG-Lock, disable it
5. If your system has Secure Boot Mode, disable it
6. Set OS Type to Other OS7. If you have a 6 series or x58 system with AWARD BIOS, disable USB 3.0
8. Save and exit.
UniBeast: Install OS X El Capitan on Any Supported Intel-based PC-gigabyte-z87x-ud7-th-1.jpeg

STEP 4: Install OS X El Capitan
You're almost done! All you need to do is boot from the USB drive and install! For best results, insert the USB in a USB 2.0 port.

1. Turn on the computer
2. Press the hotkey to choose boot device (usually F12, F11, F10, or F8)
3. Choose USB
4. At Clover boot screen, choose Boot Mac OS X from USB
5. When you arrive at the Installer, choose language.
UniBeast: Install OS X El Capitan on Any Supported Intel-based PC-installelcap.png
If you have issues reaching the installer, first make sure you're using a USB 2.0 port. If you're using a NVIDIA graphics card you may need to enter the extra boot flag nv_disable=1 to reach the installer. For instructions on entering boot flags see Clover Basics and Switching Advice
UniBeast: Install OS X El Capitan on Any Supported Intel-based PC-snapshot-9.png

6. For a new installation of OS X, you MUST erase and format the destination drive according to the following steps before continuing.

a. In the top menu bar choose Utilities, and open Disk Utility
b. Highlight your target drive for the El Capitan installation in left column.
c. Click Erase button
d. For Name: type El Capitan (You can rename it later)
e. For Format: choose OS X Extended (Journaled)
f. For Scheme: choose GUID Partition Map
g. Click Erase
h. Close Disk Utility
7. When the installer asks you where to install, choose El Capitan, or your existing install.
8. Upon completion, the system will automatically restart.


STEP 5: Post Installation with MultiBeast
MultiBeast is an all-in-one post-installation tool designed to enable boot from hard drive, and install support for Audio, Network, and Graphics. The installation is complete, but the drive isn't bootable yet. Boot from the USB again, this time choosing El Capitan.

1. Turn on the computer
2. Press the hotkey to choose boot device
3. Choose USB
4. At the Boot Screen, choose your new El Capitan installation.
5. Complete OS X El Capitan setup
UniBeast: Install OS X El Capitan on Any Supported Intel-based PC-mb_circle.png
6. Open and run Multibeast. If your system requires installing Clover to the root of the drive, such as Gigabyte 6 Series and X58 systems, skip to STEP 6
UniBeast: Install OS X El Capitan on Any Supported Intel-based PC-multibeast-1.png
7. If this is a fresh installation, click Quick StartUEFI Boot Mode is recommended for 7/8/9+ Series CustoMac desktops and all UEFI capable systems. Legacy Boot Mode is recommended for 5/6 Series CustoMac desktops and all BIOS based systems.
UniBeast: Install OS X El Capitan on Any Supported Intel-based PC-multibeast-2.png
8. Choose the appropriate audio and network options for your system:
UniBeast: Install OS X El Capitan on Any Supported Intel-based PC-multibeast-3.png
9. Click Customize for further options
UniBeast: Install OS X El Capitan on Any Supported Intel-based PC-multibeast-4.png
10. Click Print or Save to back up your configuration
11. Click Build then Install 
UniBeast: Install OS X El Capitan on Any Supported Intel-based PC-multibeast-5.png
If using a NVIDIA 'Maxwell' GeForce GTX 750, 750 Ti, 950, 960, 970, 980, 980 Ti, or TITAN X graphics card, OS X graphics drivers are not natively supported. Alternate NVIDIA drivers are required. 

12. (Optional) Download and install Alternate NVIDIA Graphics Drivers13. Reboot 

UniBeast: Install OS X El Capitan on Any Supported Intel-based PC-elcap-desktop.jpg

Yay! You now have a fully updated bootable version of OS X El Capitan on your CustoMac! And a super handy USB rescue drive. It's easy to get frustrated, but don't give up! If you get stuck, there are many users with similar hardware in the tonymacx86 Forum to provide support. 

Thanks to all of the hard working developers, hackers, and testers all over the world without whom this guide would never have been possible. 


STEP 6: Alternate Post-Installation
This alternate post-installation method was in place before MultiBeast was released. If you have already used MultiBeast you do not need to follow these steps. Follow this method if your system requires installing Clover to the root of the drive.

1. Press the hotkey to choose boot device
2. Choose USB
3. At Clover boot screen, choose Boot Mac OS X from El Capitan
4. Complete OS X El Capitan setup
5. Download El Capitan Post-Install Tools
UniBeast: Install OS X El Capitan on Any Supported Intel-based PC-clover-circle-medium.png
The Post-Installation.zip contains two custom Clover installers and essential kexts. This will provide boot from hard drive in place of MultiBeast. Alternately, continue booting from the USB drive. 

6. Run one of the custom Clover installers. UEFI Boot Mode (Clover_v2.3k_r3320_UEFI.pkg) is recommended for 7/8/9+ Series CustoMac desktops and all UEFI capable systems. Legacy Boot Mode(Clover_v2.3k_r3320_Legacy.pkg) is recommended for 5/6 Series CustoMac desktops and all BIOS based systems. Legacy Boot Mode - Root (Clover_v2.3k_r3320_Legacy_Root.pkg) is for older systems that cannot boot from EFI partition. For further bootloader customization, download and run the official Clover package. For further bootloader customization, download and run the official Clover package
7. Run CustoMac Essentials to install FakeSMC and Ethernet support. 

The next steps configure the system definition, configure graphics, and provide it with a unique serial number. 

8. Download and open Clover Configurator
9. Your config.plist should auto-mount. If not, choose Mount EFI Partition.
10. Select SMBIOS tab
11. Press Magic Wand Icon
12. Choose a System Definition from the list. Then choose a version of the system from the dropdown. This will auto-populate your config.plist with appropriate SMBIOS information including a unique serial number. If you're unsure what to choose, Mac Pro 3,1 will work for most desktop systems. 
13. (Optional) If you have an existing Chimera SMBIOS located at /Extra/smbios.plist, you can choose the same system definition in Clover Configurator, then copy that serial number into your config.plist manually. 
14. (Optional) If you configured graphics for the UniBeast installation, open Graphics tab and selectInject NVIDIA or Inject ATI
15. Save and close Clover Configurator. 

The next optional steps configure the system's Realtek ALC onboard audio codec. 

16. (Optional) Download CloverALC110 script17. (Optional) Browser/Click on download file
18. (Optional) Finder/Double click .command file 
19. (Optional) Go through steps in Terminal to install appropriate audio choices

If using a NVIDIA 'Maxwell' GeForce GTX 750, 750 Ti, 950, 960, 970, 980, 980 Ti, or TITAN X graphics card, OS X graphics drivers are not natively supported. Alternate NVIDIA drivers are required.

20. (Optional) Download and install Alternate NVIDIA Graphics Drivers21. Reboot


http://www.tonymacx86.com/el-capitan-desktop-guides/172672-unibeast-install-os-x-el-capitan-any-supported-intel-based-pc.html