if you have ever wanted to play a movie, video, or multiple videos as a screen saver on a Mac, then SaveHollywood is the screensaver for you. The free download allows for playing just about any locally stored video file format as the OS X screen saver, with many options for customization.
This is great whether you want to play some of the videos captured on your iPhone as your Macs screen saver, or if you want your favorite movie to play when the Mac is inactive.
How to Play Any Movie as a Screen Saver in Mac OS X
Get SaveHollywood from the developer, it’s a free download, unzip the file and double-click the SaveHollywood.saver file to install the screen saver*
Open System Preferences from the Apple menu and go to “Desktop & Screensaver” if you haven’t already done so through the installation process, then go to “Screensaver” and locate “SaveHollywood” from the left side
Adjust the SaveHollywood preferences as appropriate for your video(s) playing needs
Drag & drop a movie or video file(s) into the settings to add the video, or click the [+] plus button to add a video manually to the screensaver
Click on “Preview” or start the screen saver as usual to test the movie playing out
In the example here, I am using one of the Aerial Apple TV screensavers of Hawaii downloaded locally as a video file (sample file is here as a 150MB .mov) rather than streaming it from Apple servers, but you can add or play any movie you want that’s on the Mac.
SaveHollywood has a variety of options, including the ability to play multiple movie files, play multiple movies randomly, play from the last stopped position, resize the video to fit screen or to play at the actual size, draw borders, show the movies title and copyright, and the ability to play movies audio at a set level or mute the video. You can even set the background color if the video is a different format from what the screen resolution setting accommodates.
It appears that just about every major movie file format is supported, so as long as the video opens in QuickTime Player it will almost certainly open and play in SaveHollywood as a screen saver as well. If you’re encountering a video file that won’t play use one of the free Mac video conversion apps discussed here to bring the file to a compatible format.
Screen Capture & Save Screen Shots with Preview in Mac OS X
The Preview image editing and photo viewing app in Mac OS X includes the ability to capture screen shots directly within the application. The resulting images open directly into Preview rather than saving to the Mac desktop, allowing user changes to file size, resolution, color, and file format.
There are three different screen capture modes available in Preview that are almost identical to the standard keyboard shortcuts that are typically used on the Mac. Here’s how to use each of the three options to take images of the entire screen (or screens) in the Preview app of OS X:
Launch Preview
From the “File” menu select “Take Screen Shot” and choose one of three options:
From Selection – brings up the selection tool, just like command+shift+4
From Window – enables the window selection tool, like command+shift+4+spacebar
From Entire Screen – capture the entire screen (or both screens if you’re using two), same as command+shift+3
The screen shots launch automatically into Preview where they can be cropped, manipulated, and saved. All of this is instant with the exception of capturing the entire screen, which causes a timer to be displayed
The timed screen shot feature was previously limited to the Terminal or Grab, but it’s pretty handy to have directly in Preview, with the countdown timer showing up in the center of the screen like so:
Once the timer runs out, the screen is captured and launched instantly into Preview.
If you use multiple monitors, each monitors screen will be captured, and a new file will be generated for each individual monitor that is connected to the Mac. Thus, if you had 4 displays hooked up to your computer, you would create four screen shot files, or if you only have one internal screen, on say a MacBook Air, it would only generate a single screen capture for that internal display.
I originally assumed this was a fairly new introduction as of 10.7, but apparently this feature exists in many versions of the Preview app for Mac OS X, ranging from 10.6 Snow Leopard version of Preview, as well as OS X Lion, Mountain Lion, OS X Mavericks, and OS X Yosemite. Thanks for the heads up Makeup about compatibility for older versions of Mac OS X!
One of the realities of life is that, sometimes things don’t the way you plan them. Yes, even a “genius” has his off days. So it was with my install of the Yosemite Beta. After spending hours cloning my hard drive so that I could install it on a separate partition, I somehow managed to install it on my main hard drive and the separate partition too. I have NO idea how I managed to screw this up that badly, but I did it.
At first I thought I was going to dodge a bullet. Everything seemed to be running great. But as I tried other apps it became apparent that some of the mission critical apps I use were completely unstable or unbootable. Obviously I expected this to be the outcome on a beta version of the OS. Normally I would have rebooted onto my main hard drive and things would have been fine, but I didn’t have one to boot to.
TIME MACHINE TO THE RESCUE
Thankfully I have a Mac mini that acts as a network based Time Machine. By now you should not only be familiar with Time Machine, you should be using it religiously. What you might not know is that you can use Time Machine to back up multiple Macs across the network, just like the more expensive Time Capsule. There are two ways to make your own Time Capsule for less.
The first way is to use an AirPort Extreme that was made in the last 4 or 5 years and a USB Hard drive. I like the small bus powered drives based on laptop hard drives, but there is nothing stopping you from slapping on a Multi-terabyte array, as long as it has a USB port.
The second way is to set up an old Mac as an OSX Server. In my case I have a 2009 Mac mini that I bought specifically to be used as a server, but any machine that can boot 10.6 or newer can be used (although, unless you have access to 10.6 Server disks it’s going to cost you an arm and a leg to buy them, so since 10.7 and up are free, I’d recommend that the machine be able to boot 10.7 and up if it is to be cost-effective). Once you have the Server software installed ANY storage device that can be attached to the Mac can become a location for Time Machine to back up to.
This setup is fantastic, especially if you have a MacBook Pro, or a McBook Air since ether can be backed up wirelessly through the network instead of having to lug around a backup drive. Look Mom, No Cords! As with everything there is a couple of small catches when using Time Machine this way.
Non-Bootable Disk– Unlike the single machine Time Machine, the networked Time Machine doesn’t create a bootable recovery partition on the hard drive you are backing up to.
Image Files vs. Folders– The network Time Machine saves the backups of a specific machine as a disk image, while the single machine saves the info in folders that can be readily accessed.
Under normal circumstances this wouldn’t be an issue. To recover a network Time Machine backup you would boot into the recovery partition of the machine you want to restore, click restore from Time Machine, connect to the network Time Machine, select the name of the machine you want to restore, and away you go. Unfortunately the Beta updated the recovery partition on my hard drive. I could see the Time Machine Server, but I couldn’t connect to it. In my case the problem is fairly easy to solve. I could just boot from the recovery drive of another hard drive that had OSX Mavericks on it, and then perform the above steps. But what if the server itself was down, or the network was damaged/unavailable, or maybe the USB connection is faster than the network (think USB 3 vs. Fast Ethernet). What then? How do you recover the info without using a network?
THE PROBLEM
The problem breaks down into two sub-problems.
Getting the computer booted into recovery mode. We need to be in recovery mode because the Time Machine recovery program is only accessible in that mode.
Getting the Time Machine recovery program to think that a network backup is a single machine backup. The Time Machine recovery program expects to see disk images when it connects to a network backup, and a folder structure when it restores form a single machine backup. The trick is to make the Time Machine recovery program think that a disk image is not a disk image, but an actual hard disk.
HERE’S HOW YOU DO IT
1. GET THE NETWORK BACKUP DATA.
You need to get the disk image of the machine you wish to restore onto some type of portable media. In my case, I have a 4 TB external drive that I use to store the backup images on. So I just shut down Time Machine on the Server, and disconnected the external drive. If the image was on an internal HD or some non-transportable, external device (like a rack mounted array), you are going to have to copy the disk image file (see next paragraph) to something that can be plugged into the computer you want to restore. I’d suggest a USB hard drive.
The file you need is the file with the same name as the Bonjour name of the computer. In my case the Bonjour name for my computer is HAL.local. So I only need the HAL.dmg file. Unless you have this info written somewhere you are likely going to have to go to the other computers using the network Time Machine and look up their names. You can find the name at the top of the Sharing preferences in the System Preferences > Sharing.
2. GET YOUR MACHINE INTO RECOVERY MODE.
Once you have the device with the image file you need on it, plugged into the mac you need to restore, you will have to get the machine booted into Recovery Mode. There are numerous ways to do this. I’ll go over three of them
Reboot using Cmd+R: If you haven’t hosed up your recovery partition, you can reboot the machine and hold down the Command and the R keys at the same time until you see the Apple logo screen.
Use/Make an emergency boot disk: If you are like me you have a couple hard drives around with versions of OSX installed on them. You can simply use one of them to get booted into recovery mode (See above about Cmd+R). If you don’t have an emergency disk, you are going to need 3 things. 1) An 8GB or larger Flash Drive, 2) someone with OSX 10.7 or higher installed on their computer, and 3) DiskMaker X. After installing DiskMakerX on your friend’s computer you can follow the prompts and you will have an emergency drive.
Use someone else’s Time Machine Backup: Since a single machine’s Time Machine disk is bootable, you can borrow it to boot into recovery mode (See above about Cmd+R).
3. GET THE DISK IMAGE MOUNTED.
The Time Machine Recovery program expects to see a hard drive with a special folder attached to the Mac you want to restore. Unfortunately the network Time Machine doesn’t store the backups this way. Since the special folder is being stored in a disk image, we need to get the image mounted so that the recovery program will think it is a hard drive connected to our Mac. Normally we could just double-click on the image file and it would automatically mount. But recovery mode is not a full version of the OS. Since there is no Finder, we can’t just double-click. This is where things become a bit complex, I have created a video showing the steps below. You can find it in the near the bottom of this post.
Click on Disk Utility.
Click the Continue button.
When Disk Utility comes up, click the name of the hard drive that has the disk image file on it.
Click the Restore tab.
Click the Image button.
Click on the name of the hard drive with the disk image on it.
Find the disk image file and click on it.
Click the Open button.
Find the DMG file in the left column.
Click the DMG.
Click Open. You will get a message that says the image is mounting, just wait until it goes away.
Quite Disk Utility
4. RESTORE FROM BACKUP.
At this point you should be back to the main recovery mode screen. Now that we have what the Recovery Time Machine program expects to see, we can finish this up just like a single machine recovery.
Click on Restore from Time Machine Backup.
Click the Continue button.
When the Restore program comes up, click the Continue button.
Select the Disk image icon.
Click the Continue button.
Select which Backup you want to restore and click the Continue button.
Select the drive to restore to.
Click the Continue button. A warning pane will drop down to tell you that you are going to erase the drive.
Click the Continue button.
PMGTV: NETWORK RESTORE VIDEO
WRAP UP
Once the restore begins it will likely take forever. In my case I did 500GB in about 4 and a half hours. Your mileage will vary. Obviously this is a bit of a propeller head post. If you are the type that learns better by seeing it done, check out the video. I hopefully you will never have to go through all this to get your data back. Remember, BACKUP, BACKUP, BACKUP!
I received a call from a client who was having a terrible time reformatting a G-Raid Array. For those of you who aren’t aware, the G-Raid drives are setup using the Apple Disk Utility. These drives are usually configured as a “Software” striped RAID array (RAID 0). When connected to a Thunderbolt or ESATA interface these striped drives provide an array with transfer speeds that are easily fast enough for most users needs. My client found himself in the enviable position of having an extra 8TB array. He decided that the best use for this extra drive was to turn it into a Time Machine backup. In addition he wanted to change the drive from a striped array to a mirrored array.
THE PROBLEM
My client opened the Apple Disk Utility and clicked on the array. He them clicked on the Delete button in the lower right corner assuming that this would delete the array. Instead he got a message stating that the array can’t be deleted while it is online. So my client unmounted the array and clicked Delete again. Much to his annoyance he got the same error message. No matter what he tried the same message kept popping up. It turns out that as long as a drive in the array is connected to the computer the system considers the array as being online and un-deletable. With his sanity hanging by a thread, he called me.
THE SOLUTION
The solution is simple, but totally un-Mac like. You have to damage the array to the point it goes off-line. One way to do this is to disassemble the array, remove a drive, reboot, and reformat the remaining drive. This is WAY too much work for my taste, and in this case would have voided the warranty on a new device. I prefer the simple way.
THE SIMPLE WAY
All you have to do is erase the hard drives that make up the array. Once the drives that make up the array were wiped the array disappears and the system allows you to create a new array out of the erased drives. In case you are the visual type, I have created a quick 4 minute video showing the exact process.
Update your email account settings when your email account password changes, your mail server or the security settings change, or when you want to customize settings, such as how your name is displayed to other people.
The settings you can change vary by account type. For example, if you’re using an Exchange account, only the Exchange server admin can change your name as it appears to other people.
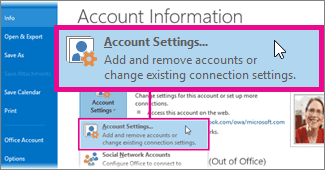
Click File > Account Settings > Account Settings.
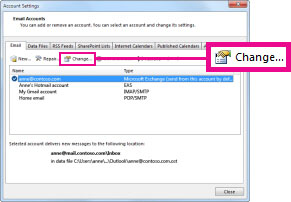
Select the email account you want to change, and then click Change.
Update your email account password
If you want to change the password used to access your mail server, follow the instructions provided by your email account provider. After your password for the mail server changes, then change the password saved in Outlook.
Under Logon Information, in the Password box, type your password.
If you don’t want to be prompted to enter your email account password each time you send and receive messages, select the Remember password check box.
If you select the Remember password check box, your account is accessible to anyone who has access to your Windows computer account.
Update your email address
Occasionally, your email address might change. For example, anne@contoso.com might become anne1@contoso.com. You can update the server setting in your account settings.
Under User Information, in the Email Address box, type your email address.
Click More Settings.
On the General tab, under Other User Information, if you specified an email address in the Reply email address box, make sure it’s still correct. If you leave Reply email address blank, when people reply to your email, the address you entered in step 1 is used.
With an Exchange account, only your Exchange admin can update your email address.
Update your email server
Sometimes the server you connect to in order to receive and send email might change.
For example, your ISP notifies you the outgoing mail server is changing from outgoing.example.com tosmtp.example.com. You can update the server setting in the account settings. Your email provider can give you the correct server names.
Under Server Information, in the Incoming mail server and Outgoing mail server boxes, type the server names. The name can be the same for both, but usually is different.
Change the way your name is displayed to other people
Under User Information, in the Your Name box, type your name the way you want it to appear to other people.
With an Exchange account, only your Exchange admin can update your name.
Additional settings
Click More Settings, and then you can change the following (options vary by account type):
On the General tab, under Mail Account, type the name you want to show in the Folder Pane and the Frombox (if you have added multiple email accounts).
If you are using an IMAP email account, you can control when items are deleted. Under Purge Options, check or uncheck Purge items when switching folders while online.
On the Folders tab, you can choose where mail you send from this account is saved.
On the Outgoing Server tab, you can specify whether your outgoing SMTP mail server requires authentication. This is almost always required if your ISP allows you to send email messages through your ISP email account when you are not directly connected to the ISP network. For example, if you want to send an email message with your home ISP email account and you are away from home connected to your work network, you usually must select this option.
On the Connection tab, you can configure how Outlook connects to the mail server.
If you are instructed by your ISP or email admin to change the port numbers or encryption method used by your email server, you can make the change on the Advanced tab.
On the General tab, under Mail Account, type the name you want to show in the Folder Pane and the Frombox (if you have added multiple email accounts).
On the Advanced tab, you can specify additional Exchange mailboxes to open. This can be used if another person has given you access to some of his or her Exchange folders or someone has granted you Delegate Access permissions.
To reduce the size of your offline Outlook Data File (.ost), on the Advanced tab, click Outlook Data File Settings, and then click Compact Now.
Security settings can be changed on the Security tab. Don’t change these settings unless instructed to do so by your Exchange admin.
When you’re away from the office, Outlook Anywhere enables you to connect Outlook to your Exchange account from any Internet location without a using a virtual private network (VPN) connection. To turn onOutlook Anywhere, on the Connection tab, under Outlook Anywhere, check Connect to Microsoft Exchange using HTTP, and then click Exchange Proxy Settings. Your Exchange admin must enable this feature and provide you the proxy settings
Mac’e ilk geçtiğimde bocaladığım günleri hatırlıyorum, bilmiyordum, bulmakta zorlanıyordum bazı şeyleri… Ama araştırdıkça, okuyup öğrendikçe aslında hepsinin ne kadar kolay ve basit bir şekilde kullanılmak için tasarlandıklarını her geçen gün daha iyi anlıyorum. Örneğin ekran görüntüsü almak, insan Windows’tan kalma bir alışkanlıkla PrintScreen tuşu arıyor :) Halbuki Mac’te birkaç kısayol ile çok daha kolay ve pratik ekran görüntüleri almak mümkün…
Ekranın tamamı
Command-Shift-3 kısayolunu kullandığımızda bir denklanşör sesi duyuyoruz ve o andaki ekranımızın tamamının görüntüsünü almış oluyoruz. Hemen gidip bir resim işleme programı açmaya çalışmamıza gerek yok, çünkü Mac bizim için bunu bir resim dosyası olarak masaüstüne kaydetti bile! :)
Kendi belirlediğimiz bir alanı
Command-Shift-4 kısayolu kullandığımızda ise imlecimizin bir artı işaretine dönüştüğünü görebiliriz. Basılı tutup sürükleyerek ekran görüntüsü almak istediğimiz alanı seçebilir, böylece daha sonra kesip biçmektense istediğimiz alanı anında resim dosyasına dönüştürebiliri
Tek bir pencereyi
Güzel bir sürpriz için command-shift-4 kısayolunu kullandıktan sonra klavyemizden boşluk (space) tuşuna basarsakimlecimizin bu sefer bir fotoğraf makinasına dönüştüğünü görebiliriz. Fotoğraf makinasını istediğimiz pencerenin üzerine taşıyarak pencerenin o andaki görüntüsünü, gölgelendirme efektleri ile birlikte yakalayabiliriz. Bu küçük detay o kadar faydalı ki, bir kere kullandıktan sonra insanın eli alışıyor diyebilirim :)
Peki masaüstümüzde bir resim dosyası oluşturmadan ekran görüntüsü almak ve bunu başka bir yere yapıştırmak için ne yapabiliriz? Çok basit, ekran görüntüsü alırken kullandığımız kısayol tuşlarına ek olarak bir de control tuşuna basılı tutmamız yeterli. Böylece bir resim dosyası oluşturulmayacak, ekran görüntüsü panomuzda (clipboard) yapıştırılmayı bekleyecek… :)
Özetlemek gerekirse;
Command-Shift-3 ile tüm ekranı
Command-Shift-4 ile istediğimiz alanı
Command-Shift-4 + Boşluk Tuşu ile istediğimiz pencereyi yakalayabiliyor, masaüstüne resim olarak kaydedebiliyoruz.
Control tuşunu da bunlara eklersek resim olarak kaydetmiyor, istediğimiz yere anında yapıştırabiliyoruz.
If you cannot open your Outlook Data File (.pst), or you suspect that the data file is damaged, you can use the Inbox Repair tool (scanpst.exe) to diagnose and repair errors in the file. The Inbox Repair tool scans only Outlook Data Files (.pst or .ost) on your computer and analyzes the file structure integrity.
If you are using a Microsoft Exchange account and your offline Outlook Data File (.ost) is missing items or is not synchronized with the Exchange mailbox, you can re-create the file.
Inbox Repair tool (scanpst.exe)
Scanpst.exe is installed on your computer when you install Microsoft Outlook 2010. The Inbox Repair tool tries to correct any problems by resetting the data file structure and rebuilding the headers for Outlook items. If you are using an Exchange account, the tool does not connect to or analyze the data saved on the Exchange server.
IMPORTANT You must exit Outlook before using the Inbox Repair tool. It is not accessible within Outlook.
Open Windows Explorer and select the drive:\Program Files\Microsoft Office\OFFICE14 folder.
Double-click Scanpst.exe.
In the Enter the name of the file you want to scan box, enter the name of the .pst or .ost file that you want to check, or click Browse to select the file.
To specify the scan log options, click Options, and then click the option that you want.
Click Start.
If errors are found, you are prompted to start the repair process to fix the errors.
A backup file is created during the repair process. To change the default name or location of this backup file, in the Enter name of backup file box, enter a new name, or click Browse to select the file that you want to use.
Click Repair.
Start Outlook with the profile that contains the .pst file that you tried to repair.
In the Navigation Pane, click Folder List.
Keyboard shortcut To open switch to the Folder List, press CTRL+6.
In the Folder List, you might see a folder named Recovered Personal Folders that contains your default Outlook folders or a Lost and Found folder. The recovered folders are usually empty, because this is a rebuilt .pst file. The Lost and Found folder contains the folders and items recovered by the Inbox Repair tool.
You can create an Outlook Data File (.pst), and drag the items in the Lost and Found folder into the new data file. When you have finished moving all the items, you can remove the Recovered Personal Folders(.pst) file, including the Lost and Found folder, from your profile.
NOTE
If you are able to open the original Outlook Data File (.pst), you may be able to recover additional items from your damaged .pst file. By default, the Inbox Repair tool creates a file with the same name, but with the file extension of .bak. The .bak file is located in the same folder as your original .pst file. You may be able to recover items from the .bak file that the Inbox Repair tool could not recover. Make a copy of the .bak file, and give the file a new name with a .pst extension, such as bak.pst. Import the bak.pst file, and then move any additional recovered items to the new .pst file that you created.
A copy of the log file is saved to the same folder as the .pst file.
Offline Outlook Data Files (.ost) are copies of your Exchange information. It is not necessary to back up this file. You can create a new copy at any time.
Exit Outlook.
In Control Panel, click or double-click Mail.
Where is Mail in Control Panel?
Mail appears in different Control Panel locations depending upon the version of the Microsoft Windows operating system, Control Panel view selected, and whether a 32- or 64-bit operating system or version of Outlook 2010 is installed.
The easiest way to locate Mail is to open Control Panel in Windows, and then in the Search box at the top of window, type Mail. In Control Panel for Windows XP, type Mail in the Address box.
NOTE The Mail icon appears after Outlook starts for the first time.
The title bar of the Mail Setup dialog box contains the name of the current profile. To select a different existing profile, click Show Profiles, select the profile name, and then click Properties.
On the E-mail tab, select the Exchange account, and then click Change.
Clear the Use Cached Exchange Mode check box.
Click More Settings.
On the Advanced tab, click Offline Folder File Settings.
Click Disable Offline Use, and then in the dialog box that appears, click Yes.
NOTE If you cannot click Disable Offline Use, this indicates the Use Cached Exchange Mode check box was not cleared in step 4. This check box must be cleared.
Again, click Offline Folder File Settings.
Click OK.
In the dialog box that appears, click Yes.
Under Cached Exchange Mode Settings, select the Use Cached Exchange Mode check box.
Click OK, click Next, and then click Finish.
In the Account Settings and Mail Setup dialog boxes, click Close.


 The Preview image editing and photo viewing app in Mac OS X includes the ability to capture screen shots directly within the application. The resulting images open directly into Preview rather than saving to the Mac desktop, allowing user changes to file size, resolution, color, and file format.