9 Haziran 2019 Pazar

How to Remote Access your Mac from an External Computer

How to Remote Access your Mac from an External Computer

Remote Access Mac External Computer Featured
Over the last decade, Apple has focused strongly on making its computers portable. This doesn’t just apply to laptops, either. Take a look at the Mac Mini for another example. Even the trashcan-style Mac Pros are much more portable than older Mac Pro models.
Portable or not, there are still times you want to access your Mac remotely. There are many different ways to do this, but we’re going to look at a few of the easier ways.

Set Up Your Mac for Remote Access

To log in and control your Mac remotely, first you’ll need to set it up so that this can be done. For security reasons, this is disabled by default.
There are a few different ways that you can log into your Mac remotely, and they’re enabled in different ways. If you’re logging in from another Mac, you’ll want to enable “Remote Management.”
Open System Preferences, then find the Sharing settings menu. In the menu on the left, enable “Remote Management.” Here, select Observe, then select Control as well. Below, enable the permissions you want to have when logging in remotely.
Remote Access Mac External Computer Remote Management
If you also want to be able to log in from Windows or Linux, click on Computer Settings in this menu, then enable “VNC viewers may control screen with password” and enter a password.
If you only want to log in from Windows or Linux, you can enable VNC login via the Screen Sharing setting in the left menu instead.

Optional: Set Up Your Mac for SSH Access

If you’d like to access your Mac from a terminal, you can also enable SSH access. To set this up, open the System Preferences, then go to the Sharing Menu.
Remote Access Mac External Computer Ssh Setup
Here, simply check the box next to Remote Login. By default, only Administrators will be able to access the Mac via SSH and SFTP. You can set this to all users if you’d like, but it’s somewhat riskier.

Accessing Your Mac Remotely

Now that your Mac is ready to access remotely, we’ll take a look at a few ways you can do it.

Apple Remote Desktop

Despite being an Apple app, this is not included with macOS by default, and it’s far from free. If you want to use Apple Remote Desktop, you’ll need to purchase it for $79 from the App Store. If you’re administering a large number of Macs, this may be worth it, but it’s overkill for home users.

VNC

There are plenty of VNC clients available for Mac, Windows, and Linux, all of which will let you access your Mac remotely. TightVNC is a free option that is available for Windows and Unix systems and is known to work with the macOS VNC server. RealVNCis another option.
To connect, simply type in the IP address of your Mac. This is visible when setting it up to allow remote connections. Type in the password you set to connect.

Screens

Remote Access Mac External Computer Screens 4
If you want to connect from a Mac but don’t want to pay for Apple Remote Desktop, Screens 4 is a nice alternative. It works with Apple Remote Management but is available for a much cheaper price at $29. Screens 4 is also available for iPad for just $19.99.

Conclusion

Being able to log into your Mac remotely can be very handy. Just remember that if you can log into your computer remotely, so can someone else. Every door you leave open into your computer could potentially be used by someone else.
For a look at just how wrong this could go, turn to the Windows Remote Desktop Protocol. We’ve previously taken a look at just how easily this service can be used against you. With any remote access, it’s always best to use it only when necessary.

Latest Windows 10 Update Problems and How to Fix Them

Latest Windows 10 Update Problems and How to Fix Them

In some ways, like the antivirus stuff, Microsoft has come along very well in making Windows 10 a stable system, but in others? Not so much. Windows 10 updates are a perpetual cause of problems for a lot of users, so we’ve decided to create a regularly updated feed of the latest Windows 10 update problems: what the issues are, what Microsoft’s doing to fix them, and how you can avoid them.

At the time of writing Microsoft is working on features to mitigate the pain of faulty updates. Preview builds now have the option to postpone Windows updates for up to thirty-five days, and Microsoft has just announced that it may soon be rolling out an update that – get this – will roll back broken Windows 10 updates.
It’s a good idea, but just imagine if this update was itself broken, and you had to find a way to roll back the rollback-enabling update? Yep, it would be ironic, but on Microsoft’s current form not all that surprising.

[FIXED] Windows 10 May 2019 Update (v1903)

Known issues: Display brightness not working, Camera app not working, Wi-Fi cutting out, Sound not working with Dolby Atmos headphones, AMD RAID driver problems, Night Light settings not working, Duplicate Files in user profile directory
The latest version of the Windows 10 May 2019 update comes with a host of new features, including an improved Start menu, a new light theme, and a new-and-improved Microsoft Edge, based on Chromium.
Along with that however, come several problems which we’ve listed above. You should also bear in mind that this is a big update, and Microsoft has removed several features from Windows 10 such as the Print 3D app, which has been replaced by 3D Builder, and Windows To Go, which will no longer be supported by Microsoft.
Aside from the features Microsoft intentionally removed, all the above issues have been fixed by the KB4505057 patch, which you should install immediately if you haven’t already.

[FIXED] May 2019 Update (Updating from 1803-1809)

Windows 10 Update Problems May 2019
The May 2019 update for Windows 10 is due soon. The problem, however, is that it won’t be arriving on time for everyone. The affected users are those who with USB storage and SD cards inserted into their computers, because for some reason having those things connected may cause “inappropriate drive reassignment” during installation of the update.
At this point, if you try installing the May 2019 update while you have USB storage or an SD card connected, you’ll get a message saying “This PC can’t be upgraded to Windows 10”.
Luckily, the solution here isn’t just that you have to wait for the proper update to roll around. You can simply remove the external storage in question, reboot your PC, and the update should work again.
For most users, the May 2019 update should come out towards the end of May… naturally.

[FIXED] Cumulative Update KB4482887

Symptoms: Lowered performance in demanding video-games.
On 1st March, Microsoft released the KB4482887 update, which addressed a number of minor issues ranging from remote desktop performance to the implementation of Retpoline, which is designed to mitigate the effects of the Spectre security vulnerability.
A side effect of this was a hit to video-game performance, which included lower frame rates, input lag and other inconveniences. Not fun, but nearly two weeks in, Microsoft claims to have resolved the bug with update KB4489899.

[FIXED] Windows 10 October 2018 (1809) Update Problems

Symptoms: Wiping contents of Documents folder | Audio bugs | Blue Screen crashes | Mapped Network Drive problems
latest-windows-10-update-problems-bsod
[UPDATE] 6/2/19: Yep, we’re still here, reporting on the whereabouts of an update that should’ve been widespread four months ago. The latest slip-up in the October 2018 update saga was that Windows Update was refusing to actually install it due to bad DNS settings. Microsoft is aware of the problem and claims to have now fixed it, though reports are still trickling through of users unable to get the October 2018 update.
At the end of January the October 2018 feature update was only installed on 12.4% of machines, according to AdDuplex [via TechRadar]. It better get a move on, because the major April 2019 feature update isn’t so far away at this point!
18/12/18: You know that October update that in reality ended up being a November update? Well, it’s now been updated again in December, this time getting rid of the various problems it caused various users.
At the time of writing you need to install the update manually, and Microsoft recommends it “for advanced users,” which isn’t that reassuring. Still, hopefully that puts the October 2018 update problems to bed, and we can go into 2019 with a sort-of fresh start.
16/11/18: Microsoft has re-released the October 2018 update (1809) with the original issues seemingly ironed out. However, some users are reporting that their mapped network drives have disconnected since the update, without a way of getting them to reconnect.
Microsoft is aware of the issue but might not release a fix for this issue until 2019. Head further down the page to see how to roll back a Windows update or defer the update altogether.
10/11/18: The inspiration for this whole guide was the rather catastrophic October 2018 update for Windows 10 (version 1809). The update caused untold issues for Windows users – from BSOD crashes to sound issues, to deleting everything in their Documents folder.
The whole thing was such a mess that Microsoft actually had to recall the update and warn people to not install it. As of the date of writing this guide (which we note is no longer in October), the October 2018 update hasn’t been rolled back out to the public again. It’s probably for the best, though that does little to help those who’ve already lost their data because of it.
For those already on the doomed October update, Microsoft has issued fixes for the BSOD and audio issues, and if you haven’t lost your data in Documents yet, you’ll probably be fine. With that said, you can scroll down the page to see how to roll back this Windows build to a previous version.

How to Fix and Avoid Broken Windows 10 Updates

Check Your Windows 10 Build

Before looking into rolling back and fixing broken Windows 10 updates, you need to check which build of Windows you’re currently on, which will confirm which issues are affecting you. To do this, just go to “Settings -> Update & Security -> View update history.”
In the new window click the arrow next to “Feature Updates” to see the version of Windows that you’re currently using, and click “Quality Updates” to see all the smaller “KB” updates you have installed.
latest-windows-10-update-problems-check-updates

Block and Defer Windows 10 Updates

The first thing you can do to avoid getting the above update problems and more is to take over the control when your Windows 10 updates. This way you can hold off getting updates the moment Microsoft rolls them out, monitor the news for a bit to see if any major errors crop up, then manually do the update yourself.
Recently, Windows Insiders revealed that an update is coming to Windows 10 (around April 2019) which will allow all Windows users (including Home users) to pause updates by up to seven days. In the meantime, if you’re on Windows 10 Pro, enterprise, Education or S, you can postpone updates by going to Settings -> Update & Security -> Windows Update. Here, select the option ‘Choose when updates are installed’ and pick the number of days you’d like to delay it by.
There’s another way to take control of Windows 10 updates – depending on whether you have the Home or Pro version of the OS – and we have a guide that takes you through disabling and scheduling Windows 10 updates.

How to Roll Back Windows 10 Updates

After every major update Windows 10 gives you a ten-day window to roll back to a previous version of Windows. It’s a useful feature and should give you enough time to judge whether you have a problematic update. Of course, this won’t recover your files if Windows 10 deletes them, but at least you’ll be on a more stable version of the OS.
latest-windows-10-update-problems-go-back-to-earlier-build
To do this, go to Windows 10 Settings, then click “Update & security -> Recovery.” Below “Reset this PC” you should see the option to “go back to the previous version of Windows 10.” Click “Get started,” then follow the steps to roll back Windows 10. Again, this option is only available for ten days after a Windows 10 build update.

Conclusion

Few things on PC are more frustrating than an update – ostensibly to improve performance – borking your system, but unfortunately Microsoft has form in this respect. It’s worth saying that the majority of users go through these updates without issue, but the majority isn’t enough when the consequences for the few can be so severe. Stay tuned here for the latest Windows 10 update issues and leave a comment if you have new update problems to report – help may be at hand.

How to Prepare Your Mac to Upgrade to macOS Mojave

How to Prepare Your Mac to Upgrade to macOS Mojave


How to Prepare Your Mac to Upgrade to macOS Mojave
It's that time again: another version of macOS is just around the corner. In less than two months, you'll be able to upgrade your Mac to macOS Mojave. The latest version of Apple's desktop operating system is light on big, new features, but strong on under-the-hood enhancements.
Should you upgrade your Mac to Mojave? Can your Mac even be upgraded to Mojave? And how should you prepare for this big change? In this article, I'll answer all those questions, so you can be ready to upgrade your Mac to macOS Mojave when Apple officially releases its new operating system.

Compatibility

The first thing to check is whether your Mac is compatible with Mojave. Any Mac released in mid 2012 or later will be able to run Mojave, and some older Mac Pros will also be able to run it.
  • MacBook Pro (mid 2012 and later)
  • MacBook Air (mid 2012 and later)
  • MacBook (early 2015 and later)
  • iMac (late 2012 and later)
  • iMac Pro (2017 and later)
  • Mac Mini (late 2012 and later)
The Mac Pro is an special case. All Mac Pros from late 2013 and later (that's the trashcan Mac Pro) will run Mojave, but earlier models, from mid 2010 and mid 2012, will also run Mojave if they have a Metal capable graphics card. This means that you can run Mojave on a "cheese grater" Mac Pro if it has the appropriate graphics card; you can also upgrade that graphics card, if you want to be able to run Mojave. This article from the Production Expert blog explains which graphics cards are Metal compatible.
If you're not sure of the vintage of your Mac, go to the Apple menu, and choose About This Mac. You'll see its model and year.

Check Software Compatibility

All of Apple's software will be compatible with Mojave from day one, and many major apps will as well. But there's a possibility that one or more apps that you depend on won't be. App developers have plenty of time to ensure the compatibility of their products, but, in some cases, they don't work quickly enough, or it's not possible to make their apps compatible.
It is essential that you check to make sure that your apps are compatible. Imagine if you don't, and you find that one app you use to perform in important task for your clients doesn't work? You'll have to use your backup (see below) to revert to High Sierra.
Apple does not maintain a list of compatible apps, but you can find lists in various places, such as this Reddit thread; and, here's a list of incompatible apps, also on Reddit. Each app developer should say on their websites, or in Mac App Store information, whether they are compatible.
It's especially important that you check any hardware drivers for compatibility. For example, if you use a RAID storage device, and its driver isn't updated, you won't be able to access your files on that device, and if you have a graphics card whose drivers are not part of macOS, you'll need to make sure they have been updated to use your Mac correctly.
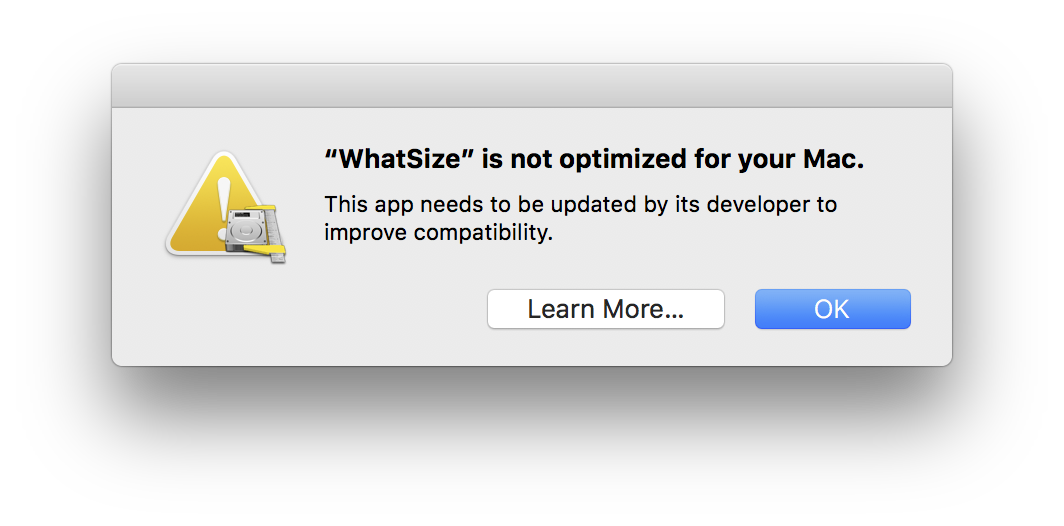
You may notice—and you may already have—that some apps, when launched, engender a dialog saying that they are not optimized for your Mac. These apps run in 32-bit mode, and Apple is soon requiring that all apps be 64-bit. 32-bit apps will still run under Mojave, but the next version of the operating system will nix them permanently. It's up to the developers to update the apps, and, in some cases, this won't be done, so be prepared to find replacements for some older apps next year.

Clean Your Mac

It's a good idea to update as much of your software as possible before upgrading to Mojave. Most apps these days offer updates automatically, or, if you've purchased them from the Mac App Store, via the App Store app. Don't worry about small apps being updated, but for things like Microsoft Office, or Adobe's Creative Cloud apps, and other apps you depend on for your work, it's a good idea to check for updates before upgrading to ensure that you won't have any issues.
Another thing you can do is clean out some of the gunk that has been on your Mac for a while. You can start by choosing the Apple menu > About this Mac, then clicking on Storage(RELATED: How to Use Optimized Storage to Increase Disk Space.)
You can also use Intego Washing Machine to clean up and delete files you no longer need, such as cache files, downloads, duplicates, and more.

Check Your Drive

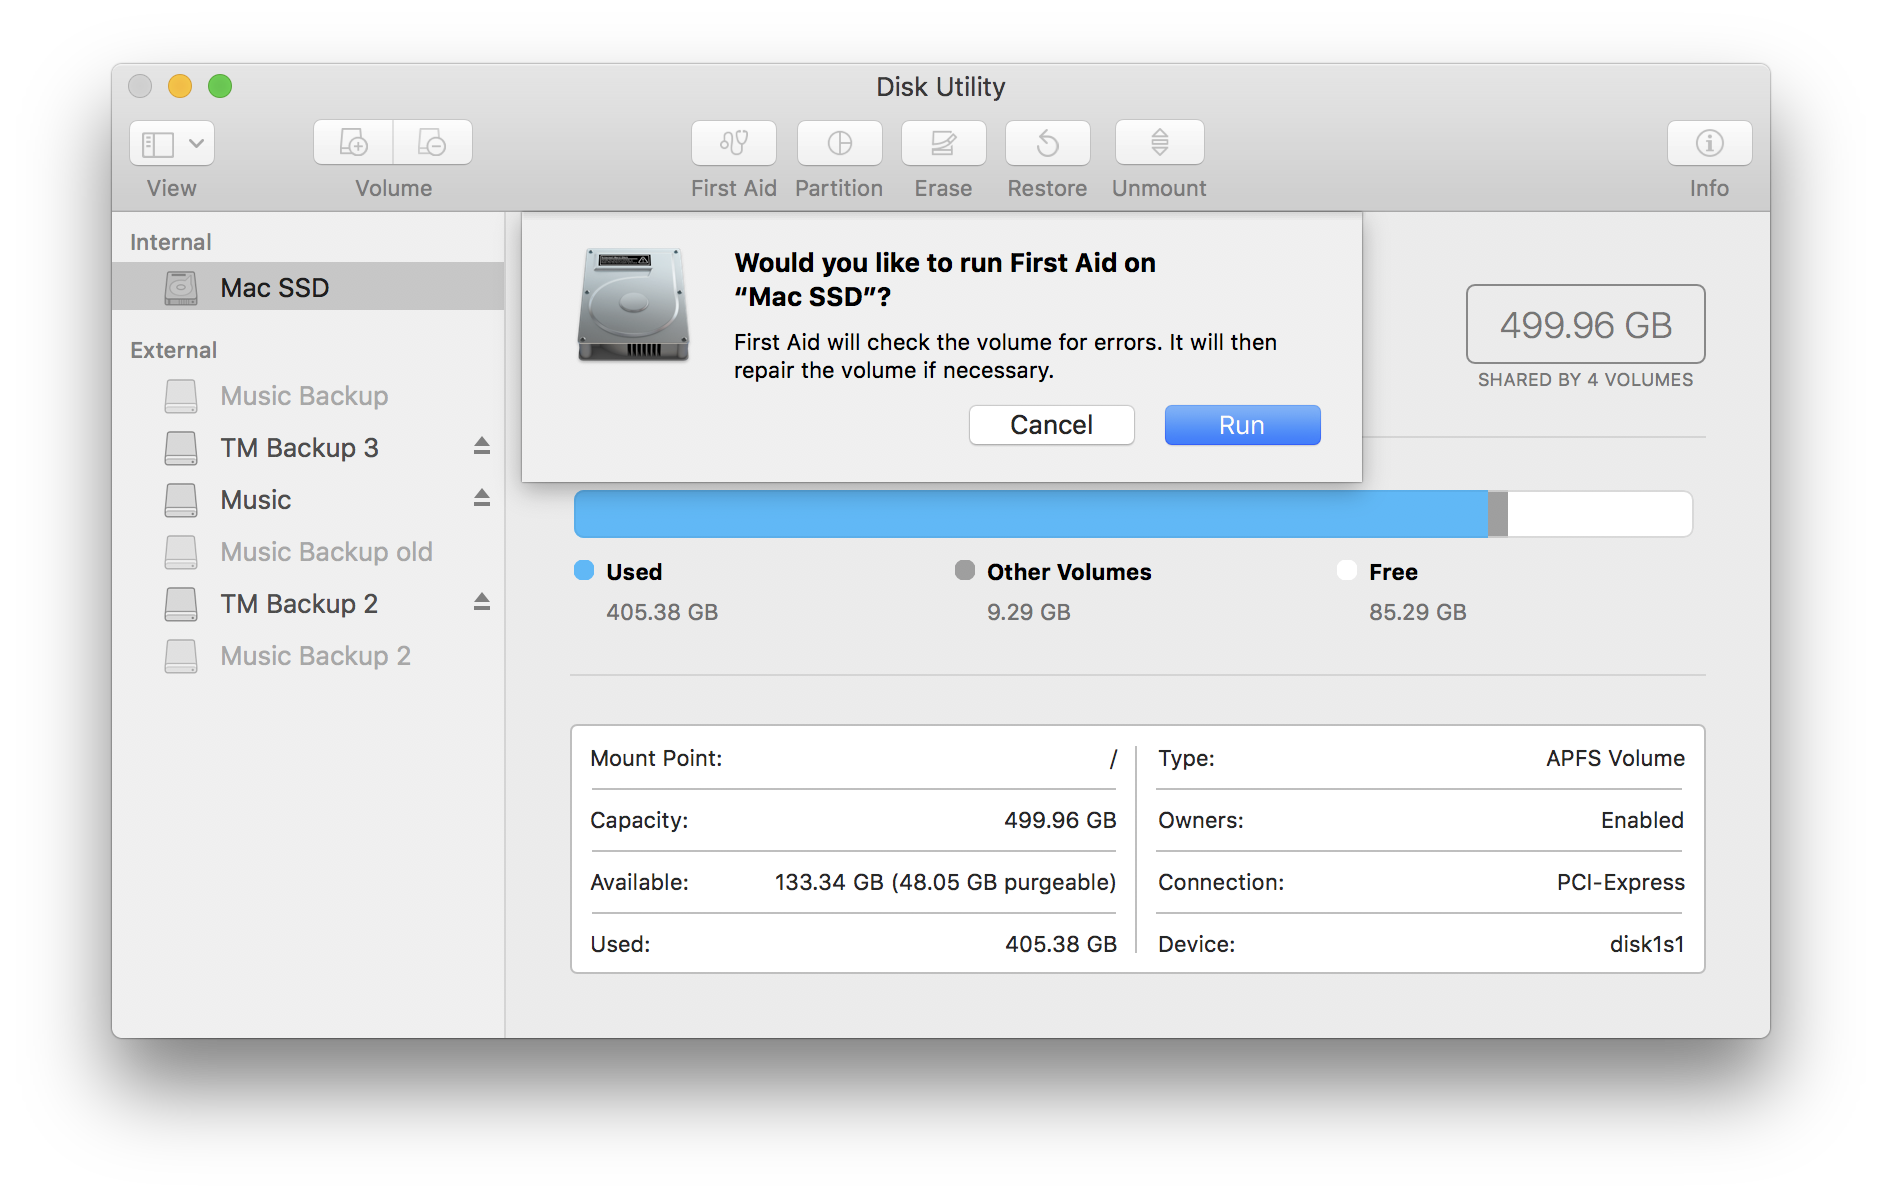
Apple's Disk Utility (located in /Applications/Utilities) is a tool designed to manage disks, but also to check them for errors. Before upgrading, it's a good idea to run Disk Utility's First Aid tool on your startup volume, as well as on the disk(s) you will use to back up your Mac (see below).
Launch Disk Utility, select your startup volume, then click First Aid in the toolbar. This will take a few minutes, and during the process your disk will be locked so Disk Utility can make repairs, if necessary. When this is completed, it will tell you if all is well, and if it has made repairs.

Back Up Your Mac

If your Mac is compatible, and you're ready to upgrade, the first thing you should do is back up your Mac. You can use Time Machine if you have an external hard drive, but the safest way to do this is to clone your drive. A clone, or bootable backup, is an exact copy of everything on your Mac's drive: system files and personal data. You can do this with Intego Personal Backup. (Related: Intego Personal Backup Compared with Apple's Time Machine)
If anything goes wrong during the upgrade process, you can boot from the external drive, and, if necessary, recopy all its files to your Mac.

Choose Upgrade Method: Migration or Clean Installation

There are two ways to upgrade a Mac. The simplest is to run the macOS Mojave installer, which will install the new files over your existing operating system. It won't alter your data, but only those files that are part of the system, as well as bundled Apple apps.
The other is to use Apple's Migration Assistant. This app is designed to move your data from an old Mac to a new one, but you can also use it for an upgrade. To do this, you should clone your Mac, on at least two drives (one to use for the upgrade, and another as a backup). Start up your Mac, then press the Option key immediately so you can select that drive as the startup drive. Launch Disk Utility (in /Applications/Utilities) and erase the drive on your Mac. (You did make two backups, right?)
Download the macOS Mojave installer and launch it. It will ask which drive you want to install the software on; select the now erased drive in your Mac. Follow the instructions to complete the installation.
When you've finished, you'll have a virgin operating system on your Mac, and you'll still be working from your external drive. You can now copy all the files in your home folder, as well as personal apps. (RELATED: Setting Up a New Mac: Should You Migrate or Do a Clean Installation?) 
A clean installation is time consuming, but it can weed out old files from apps you no longer use, and it's a good way to start with a clean slate. Some people do this for every major operating system upgrade; I only do it every few years, because it does take a long time. If you do a clean installation, make sure to keep both of your clones for some time, just in case there's something you forgot to cop over.

How to Install macOS Mojave

Okay, it's taken a while, but now you're ready. If you're installing macOS Mojave on a laptop, make sure it's charged, or connect it to a power supply; you don't want it running out of battery during the installation process.
Go to the Mac App Store and download the Mojave installer. This is about 5-6 GB, and may take some time depending on your bandwidth. When the download is complete, the installer will launch; follow its instructions. The upgrade process can take a while - a half hour or so - and this is a good time to get a cup of tea or coffee, walk the dog, or do something else instead of sitting in front of your Mac watching its progress bar.
But first... In general, after macOS is installed, the installer is deleted. If you look in /Applications, you'll see the installer, called Install macOS Mojave. It's a good idea to copy it to another location, an external drive, or, perhaps, your Downloads folder. This way you'll have another copy in case something goes wrong and you need to run it again. If your bandwidth is fast enough, this may not be necessary, but for many people it can save a lot of time to keep the installer safe. This is also useful if you have more than one Mac; you can just copy the installer to another Mac and run it.
Once the installation is completed, you'll need to go through a few screens, such as one to sign into your iCloud account. At this point, you may see an Incompatible Software screen telling you of apps that have been moved because they are known to be incompatible. You'll find them in an Incompatible Software folder at the top level of your drive

macOS Mojave Patcher Tool for Unsupported Macs

macOS Mojave Patcher Tool for Unsupported Macs

*This utility is provided to anyone free of charge, however if you'd like to donate, you can do so here:
Questions or comments? Feel free to contact me at collinmistr@gmail.com. Please take a look at the FAQ located at the bottom of this page as well.

I also have a YouTube video showing the process, which can be viewed here.

Important Note:  10.14.4 and later CANNOT be patched properly using Mojave Patcher version 1.2.3 and older. If you update to 10.14.4 or later, and HAVE NOT updated your installer volume with version 1.3.0 or later of Mojave Patcher, you WILL NOT be able to get your system to boot after updating! Please read the updates section for more info.

Contents:


Requirements:

• Early-2008 or newer Mac Pro, iMac, or MacBook Pro:
• MacPro3,1
• MacPro4,1
• iMac8,1
• iMac9,1
• iMac10,x
• iMac11,x (systems with AMD Radeon HD 5xxx and 6xxx series GPUs will be almost unusable when running Mojave. More details are located in the Known Issues section below.)
• iMac12,x (systems with AMD Radeon HD 5xxx and 6xxx series GPUs will be almost unusable when running Mojave. More details are located in the Known Issues section below.)
• MacBookPro4,1
• MacBookPro5,x
• MacBookPro6,x
• MacBookPro7,1
• MacBookPro8,x

• Late-2008 or newer MacBook Air or Aluminum Unibody MacBook:
• MacBookAir2,1
• MacBookAir3,x
• MacBookAir4,x
• MacBook5,1

• Early-2009 or newer Mac Mini or white MacBook:
• Macmini3,1
• Macmini4,1
• Macmini5,x
• MacBook5,2
• MacBook6,1
• MacBook7,1

• Early-2008 or newer Xserve:
• Xserve2,1
• Xserve3,1


Machines that ARE NOT supported:

• 2006-2007 Mac Pros, iMacs, MacBook Pros, and Mac Minis:
• MacPro1,1
• MacPro2,1
• iMac4,1
• iMac5,x
• iMac6,1
• iMac7,1
• MacBookPro1,1
• MacBookPro2,1
• MacBookPro3,1
• Macmini1,1
• Macmini2,1

— The 2007 iMac 7,1 is compatible if the CPU is upgraded to a Penryn-based Core 2 Duo, such as a T9300.

• 2006-2008 MacBooks:
• MacBook1,1
• MacBook2,1
• MacBook3,1
• MacBook4,1

• 2008 MacBook Air (MacBookAir 1,1)

Things you'll need:

• A copy of the macOS Mojave Installer App. This can be obtained from the Mac App Store using a machine that supports Mojave, or by using the built-in downloading feature of the tool. In the Menu Bar, simply select "Tools > Download macOS Mojave..."


Download macOS


• A USB drive that's at least 16 GB in size

• A copy of the tool - Download: 

(Current version: 1.3.3, SHA1: c62ddb5f4aa3c85de94126ade42e481a3de2a5a0)


• View changelog and download older versions here


Known issues:

• Graphics anomalies: Currently, pre-metal video cards used in Mojave will produce a weird darkish grey Menu Bar and Finder sidebar when using the light theme. In the dark theme, however, these anomalies are not present.

• AMD Radeon HD 5xxx/6xxx series GPU acceleration: Currently, it is not possible to get full graphics acceleration when running Mojave on a system with a Radeon HD 5xxx or 6xxx series GPU. Mojave will be almost UNUSABLE without graphics acceleration. This includes the 15" and 17" MacBook Pro systems (MacBookPro8,2 and 8,3). If you want to enable GPU acceleration on these machines, you'll need to disable the AMD GPU (This will work on MacBook Pro 8,2 and 8,3 systems ONLY. You CANNOT disable the AMD GPU in an iMac.) Weird colors will also be produced when running Mojave with one of these video cards installed/enabled. To disable the AMD GPU on a 2011 MacBook Pro 8,2 or 8,3, follow the guide found 
here.

• Built-in iSight cameras: Currently, built-in iSight cameras do not work correctly on some machines. It seems to be hit or miss, but when installing, expect your iSight camera to be non-functional.

• Trackpad (MacBook5,2 affected only). The trackpad in the MacBook5,2 isn't fully supported in Mojave. While it works and is fully usable, Mojave detects it as just a standard mouse, preventing you from changing some trackpad-oriented settings.


How to use:

1. Insert your desired USB drive, open Disk Utility, and format it as OS X Extended (Journaled).
step1
2. Open the "macOS Mojave Patcher" tool, and browse for your copy of the macOS Mojave Installer App.
step2
*Ensure that the tool successfully verifies the app.
step3
3. Next, select your USB drive in the Target Volume list, and click "Start Operation."


step4


4. When the operation completes, boot your target unsupported Mac off the USB drive you just created by holding down the Option key while turning on the machine, and selecting the drive.


step5


Note: Only perform steps 5 and 6 if you intend to do a clean install. Otherwise, you can simply skip these steps and install to your volume containg a previous version of OS X, and it'll do an in-place upgrade.


5. When the installer boots, open Disk Utility from the Utilities menu, or by double-clicking it in the Utilities window on the bottom left corner of the screen.

step6

6. Select the disk or partition you want to install on, and erase it, ensuring to use either Mac OS Extended (Journaled), or APFS as the filesystem type. If formatting an entire drive, ensure GUID is selected.

Important Note:  Using APFS is REQUIRED in Mojave in order to receive system updates via the normal Software Update method. If you choose to continue using macOS Extended (Journaled) as your filesystem type, you will NOT receive System Updates via System Preferences.

• Using APFS on Late-2009 and later machines will work no differently than it did with High Sierra.
• If you have a machine that did NOT natively support High Sierra (and therefore cannot boot APFS volumes natively), please note the following:

step7

7. Install macOS normally onto the desired volume.

step8

step9

8. When the install completes, reboot back onto the installer drive. This time, open the "macOS Post Install" application.

step10

9. In the application, select the Mac model you are using. The optimal patches will be selected for you based on the model you select. You can also select other patches of your choosing.

Step 11

10. Select the volume you have just installed macOS Mojave on, and click "Patch." When it finishes patching, click "Reboot". It may sit there for a few moments rebuilding caches before rebooting.
• If for some reason the system fails to work correctly after rebooting, boot back into your installer drive, run the post install patch again, and select "Force Cache Rebuild" before rebooting. This isn't necessary under most circumstances.

step12

11. When it reboots, it should now boot into a fully working copy of macOS Mojave.

step13

Additional Info:

• If selected in the macOS Post Install tool, your Mojave install will have a program named "Patch Updater" located in your /Applications/Utilities folder. This program will alert you when new updates to patches are available for your machine, and will prompt you to install them. If you do not have Patch Updater installed, but would like it, you can download and run the script found 
hereto do so.
Patch Updater
Re-installing Patches

• During system updates, some patches may get overwritten. Using the Patch Updater tool, it is possible to re-install these patches with one click. To do so, open the Patch Updater application, and select "View Installed Updates", or use the "View > Show Installed Updates" menu in the Menu Bar.
• To re-install a patch, simply right-click on it in the list and select "Re-install". You can also select the "Re-install All" button to re-install all currently installed patches at once.

Installed Patches List


Updates

Important Note:  Using APFS is REQUIRED in Mojave in order to receive system updates via the normal Software Update method. If you choose to continue using macOS Extended (Journaled) as your filesystem type, you will NOT receive System Updates via System Preferences. If you are not using APFS, you can follow the 10.14.1 installation steps below.

10.14.510.14.5 can be updated normally via the App Store if using an APFS volume, and will need to be patched using an installer volume created with Mojave Patcher version 1.3.1 and later after installing.


10.14.410.14.4 adds new changes that ARE NOT patchable by the post-install tool of Mojave Patcher v1.2.3 and older! Before updating to 10.14.4, you you will need to use the latest Mojave Patcher version to create a new installer volume, using the 10.14.4 installer app. Then, update to 10.14.4, either by installing via Software Update, or by just using the installer volume you've created to install.


10.14.3If you are currently running 10.14.1 or 10.14.2, you can simply use the Software Update pane of System Preferences (if using APFS) to apply the 10.14.3 update. Once the update is installed, you will most likely need to re-apply post-install patches to get the system to boot again. This process is detailed in steps 8 - 10 above. If you are currently running 10.14.0, you'll need to proceed with the 10.14.1 update method described below.


10.14.2If you are currently running 10.14.1, you can simply use the Software Update pane of System Preferences (if using APFS) to apply the 10.14.2 update. Once the update is installed, you will most likely need to re-apply post-install patches to get the system to boot again. This process is detailed in steps 8 - 10 above. If you are currently running 10.14.0, or are using a non-AFPS volume, you'll need to proceed with the 10.14.1 update method described below.


10.14.1/macOS Extended (Journaled) volumesThe Mojave 10.14.1 update does NOT install properly on unsupported machines, and could result in an unbootable OS. If you want to install the 10.14.1 update (and are not currently running 10.14.1), perform the following steps:

• Download the latest version of Mojave Patcher
• Download the installer using the Tools menu of Mojave Patcher
• Create a patched USB installer
• Boot from that, and install 10.14.1 onto the volume containing an older release.
• Once done, apply the post-install patches, and you should now be on 10.14.1.


http://dosdude1.com/mojave/

Tips for Using Mission Control on a Mac

Tips for Using Mission Control on a Mac

Mission Control, originally released with OS X Lion, allows you to organize your windows, apps, and virtual desktops, as well as run small apps known as widgets, in a dedicated space. If it sounds like Mission Control is the Mac’s built-in window manager for users, you’re on the right track, but Mission Control does a good deal more.

A Bit of Mission Control History

Mission Control is actually a conglomeration of three earlier OS X Technologies: Dashboard, Exposé, and Spaces. Exposé, the oldest of the features, dates back to 2003, and the introduction of OS X Panther.
  • Exposé allows you to hide documents and app windows, or just as easily expose a window, app, or document you need to work on.
  • Spaces lets you create and manage virtual desktops, allowing you to organize activities to specific desktops, and then switch between them as needed.
  • Dashboard is a dedicated desktop that can run mini-apps called widgets. These small apps were based on web technologies: HTML, JavaScript, and CSS.
Mission Control united these similar technologies under a single roof, or in this case, a single preference pane, to control, configure, and make use of the windows and desktop management system.

What Mission Control Does: The Basics

Mission Control’s main task is to help you de-clutter your desktop and be able to work more efficiently, even when you have dozens of apps or windows open.
There are six key tasks that Mission Control allows a user to do:
  • View all open windows: Display all windows as thumbnails to ensure every window can be seen at the same time.
  • View all windows of a specific application: Displays all windows used by a single app. If needed, the windows will be displayed as thumbnails to ensure all of the app’s windows can be seen at once.
  • Hide all windows and display the desktop: All windows are hidden, revealing the underlying desktop.
  • Manage windows across multiple monitors: Allows windows to be moved to additional displays.
  • Manage apps and windows across multiple virtual desktops: Multiple desktops can be created, each having its own set of apps and windows assigned to it.
  • Manage Dashboard widgets: Controls how Dashboard widgets are displayed.
Mission Control uses a combination of keyboard commandsgestures, and mouse shortcuts to control its various capabilities. Learning the various shortcuts is the basis for making effective use of Mission Control and its ability to help you manage the workflow on your Mac.
Mission Control's window.
Mission Control allows you to find any open window no matter how many other windows it may be hiding behind. Clicking or tapping one of the thumbnails will switch you to that window.

Setting Up Mission Control

The heart of Mission Control is its preference pane, which you can access using the following method:
Launch System Preferences by clicking or tapping its icon in the Dock, or by selecting System Preferences from the Apple menu.
In the System Preferences window that opens, select the Mission Control preference pane.
The Mission Control preference pane allows you to configure basic options as well as assign shortcuts to the various functions.
Place a checkmark in the box to enable any of the following functions:
  • Automatically arrange Spaces based on most recent use: If you’re going to use multiple virtual desktops (Spaces), this allows the most recently used desktop to be the easiest to access.
  • When switching to an application, switch to a Space with open windows for the application: This rather convoluted description just means that if an app you want to use is already open on a virtual desktop, it will switch to that desktop.
  • Group windows by application: When viewing all windows in Mission Control, have the windows organized by app.
  • Displays have separate Spaces: If you have multiple monitors you can assign each monitor its own virtual desktop.
  • Dashboard: This dropdown menu controls how the Dashboard feature is used. You can find out more in the Rocket Yard guide: Get Dashboard Up and Running Again in macOS Mojave. Although the article was written for Mojave users, its information is general enough for understanding the Dashboard options.

Mission Control preference pane
The Mission Control preference pane lets you customize shortcuts and adjust options.
Besides configuring the basic options, you can also set up shortcuts to use Mission Control by selecting a shortcut from each dropdown menu. You may have one or two dropdown menus for each item listed below. The second dropdown menu allows you to assign an alternate shortcut for the specific function. The alternate options are usually present when you have input devices with many I/O options, such as a multi-button mouse:
  • Mission Control: Use the dropdown menu to assign a shortcut to open Mission Control and display all open windows.
  • Application window: Set the shortcut that will be used to open Mission Control and display the windows of a selected application.
  • Show Desktop: This shortcut you assign will hide all windows and display the current desktop.
  • Show Dashboard: If Dashboard is enabled (see the option, above), this shortcut will display the Dashboard.
You’re not done assigning shortcuts to access Mission Control yet; you can also assign the corners (Hot Corners) of your display to be shortcuts to access Mission Control, as well as a few other functions of your Mac. Hot Corners are activated when you move the cursor into the corner of the display. If a Hot Corner is assigned for that corner, the function is activated.
Hot Corner menus
Use Hot Corners to assign Mission Control features to the four corners of your monitor.
Click or tap the Hot Corner button in the Mission Control preference pane.
A sheet will drop down, displaying a thumbnail of your desktop with dropdown menus at each corner.
Use the dropdown menu to assign a function to any of the corners. The available functions are:
The first three are Mission Control options; the remaining ones involve other Mac OS features that are dependent on the version of the operating system you’re using.
Make your selections; you can then close the Hot Corner sheet as well as the Mission Control preference pane.

Mission Control Gestures

If you have a multi-touch trackpad, Magic Trackpad, or Magic Mouse, you have even more options for accessing Mission Control features:
  • Swipe up with three fingers (Multi-touch Trackpad, Magic Trackpad): Open Mission Control and display all windows.
  • Double tap with two fingers (Magic Mouse): Open Mission Control and display all windows.
  • Swipe Down with three fingers (Multi-touch Trackpad, Magic Trackpad): Open Mission Control and display an app’s windows.
Depending on your input device, there may be additional gestures assigned to Mission Control. You can discover the gesture assignments, as well as make changes to them, by accessing the Trackpad or Mouse preference pane.
Trackpad preference pane
Use the Trackpad or Mouse preference pane to assign gestures for Mission Control.

Create a New Space

You may have noticed in our guide to setting up Mission Control, above, that we covered both Exposé (managing windows) and Dashboard, but so far, only one option about organizing spaces and nothing about creating them or making use of them. Well, it’s time to make space for spaces.
To manage spaces (virtual desktops), open Mission control using any of the shortcuts you may have created. If you didn’t make any changes, you can use the default keyboard shortcut of Control + Up Arrow to open Mission Control.
Along the top of the display, you’ll see the Spaces bar, a banner that contains text or thumbnails of all the spaces you’ve created. By default, there will be at least one space labeled Desktop.
Move the cursor into the Spaces bar, which will cause the banner to expand from a text view to a thumbnail view.
Click or tap the plus sign in the far right corner of the Spaces bar.
A new space will be created, named Desktop 2. Each new space you add will advance the Desktop number: Desktop 3, Desktop 4, etc.
Mission Control's Space bar
Desktops you create are added to the Spaces bar at the top of the Mission Control window.

Adding Apps or Windows to a Space

Each space you create is independent of the other spaces. Each space can have its own set of apps open, different desktop pictures, etc. You can even have the same app open in multiple spaces.
Spaces allows you to set up desktops for different workflows and switch between them. You could have a space for your email, calendar, contacts, and reminders, while another space is dedicated to projects you’re working on, and a third for a bit of game playing, while a fourth is being used to run Parallels and an alternate OS.
To add an app, or a window of an app, to a space, first make sure the app is open.
Open Mission Control, if it isn’t already open.
Drag the app or a specific window to the desktop in the Spaces bar you wish to use.
Once you have apps and their windows assigned to the appropriate spaces, you can exit Mission Control.

Moving or Removing Spaces

There are a number of shortcuts and gestures you can use to quickly move between spaces, as well as directly access a space using Mission Control. Below are the default gestures and shortcuts you can use to access your spaces:
Swipe left or right with three fingers on a multi-touch trackpad or Magic Trackpad.
Swipe left or right with two fingers on a Magic Mouse.
Hold down the control and right arrow keys, or the control and left arrow keys on your keyboard.
Access Mission Control and select the desktop you wish to use from the Spaces bar.
Your virtual desktops can be reordered to ensure the order you move through them, by swiping or using arrow keys, is the pattern you wish:
Open Mission Control, and move your cursor to the Spaces bar.
Rearrange the desktops by dragging them to new positions in the Spaces bar.
The desktop names will change to indicate their new position in the Spaces bar.
Should you decide you don’t need one or more desktops anymore, you can remove them by moving your cursor into the Spaces bar, and hovering it over a desktop you wish to remove. After a moment, an X will appear. Click or tap the X to remove the desktop.
Any open windows or apps on the desktop you remove will be automatically moved to an adjacent desktop.

Mission Control Tips

Moving beyond the basics, here are a number of helpful tips for making Mission Control even more productive:
You can view all the windows for a specific app by hovering over the app’s Dock icon, and then using the Application window’s shortcut, usually a three-finger swipe down or a two-finger tap.
Assign app to desktop
You can assign apps in the Dock to open in a specific virtual desktop.
You can assign an app to a space from the Dock. As long as you’ve created two or more spaces, simply right-click or control-tap the Dock icon for the app you wish to assign to the current space. Select Options, Assign to This Desktop, from the pop-up menu. You can also choose to assign the app to all desktops or to none. Once an app is assigned to a specific desktop, any time you select the app you’ll be moved to the assigned desktop.
Quick Look a Mission Control thumbnail: When Mission Control is open the thumbnail of a window may be too small to see its content. You can use Quick Look to enlarge the image. Just place your cursor over the thumbnail and click the keyboard’s space bar (not the Spaces bar).
Although you can’t change a desktop’s name in the Spaces bar, you can make each desktop be more recognizable by changing the desktop image for each desktop. Switch to a desktop, and then open System Preferences, Desktop & Screen Saver. Select a new desktop image to be used. Repeat for each desktop.
Mission Control loves full-screen apps. Any app you have running full-screen is treated by Mission Control as its own separate desktop. This allows you to use Mission Control not only to switch between full-screen apps and your other desktops but if you open Mission Control, you can add a second app to the full-screen desktop, causing two full-screen apps to be displayed in split-screen mode.
Mission Control has its own Dock icon, try clicking or tapping the icon as well as right-clicking to quickly access Mission Control features


https://blog.macsales.com/49131-tips-for-using-mission-control-on-a-mac/